The Calendar inside of PCR is a powerful tool that can be used to automatically Sync appointments made within the system to the regular calendar you already use, such as with your Outlook or Google Calendar. For information on installing and setting up the Outlook integration click HERE or contact the support team.
Once the Calendars have been synced, you will be able to perform tasks from either PCR or your personal calendar while still having the information available in both locations. This is most often utilized when scheduling interviews from the Pipeline or Follow-Up appointments via Activities.
Adding Appointments to the Schedule #
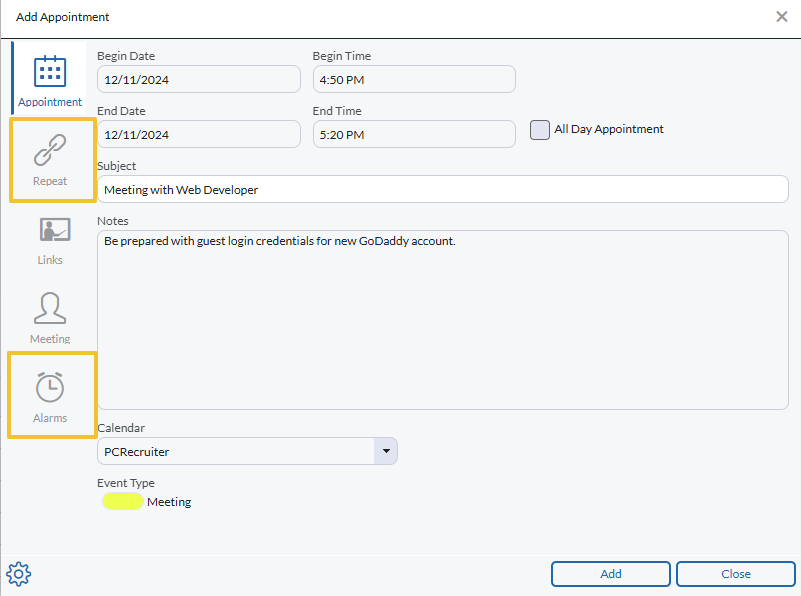
When adding an Activity to the Schedule, you have the ability to schedule an appointment, schedule recurring appointments, link to records or Rollups, request a meeting, or set an alarm.
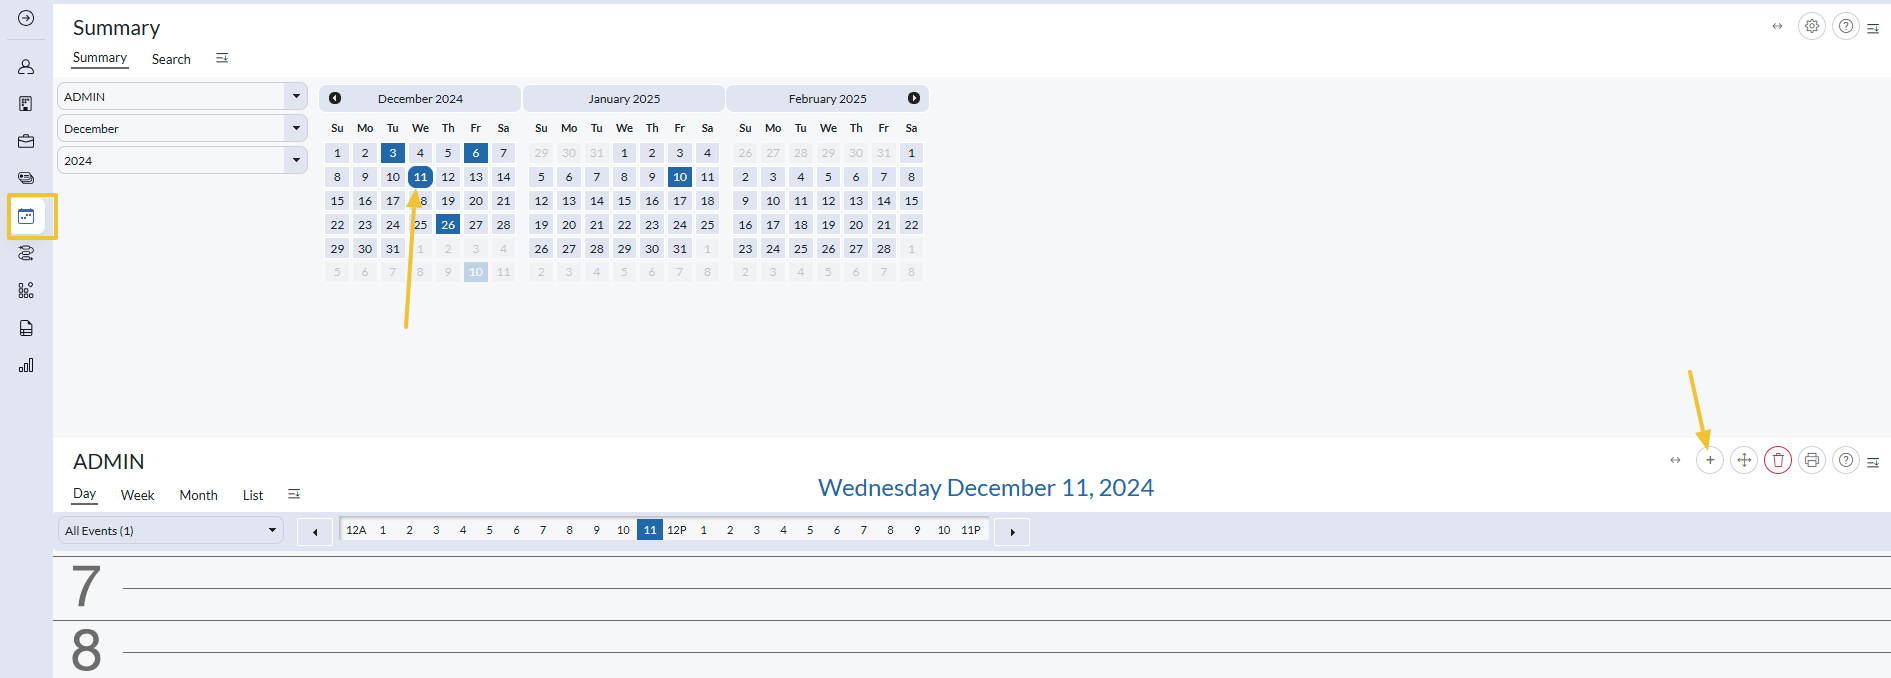
- Click Schedules from the Main Toolbar.
- Click on desired date.
- In the bottom frame, click the Add action button in the action menu (plus sign icon).
- Click inside the Begin Date and End Date fields to choose dates from a Calendar.
- Edit the Begin Time and End Time (choose “All Day Appointment” if desired).
- Enter a Subject for the appointment.
- Enter Notes.
- Select an Event Type.
- Click the Repeat charm on the left to select Repeat options (once, daily, weekly, monthly, or yearly).
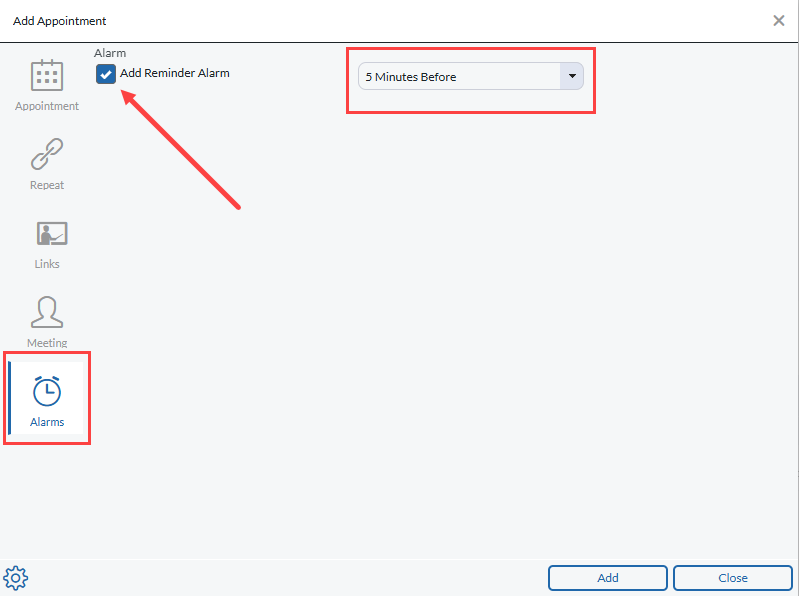
- Click the Alarms charm on the left to add an alarm if desired.
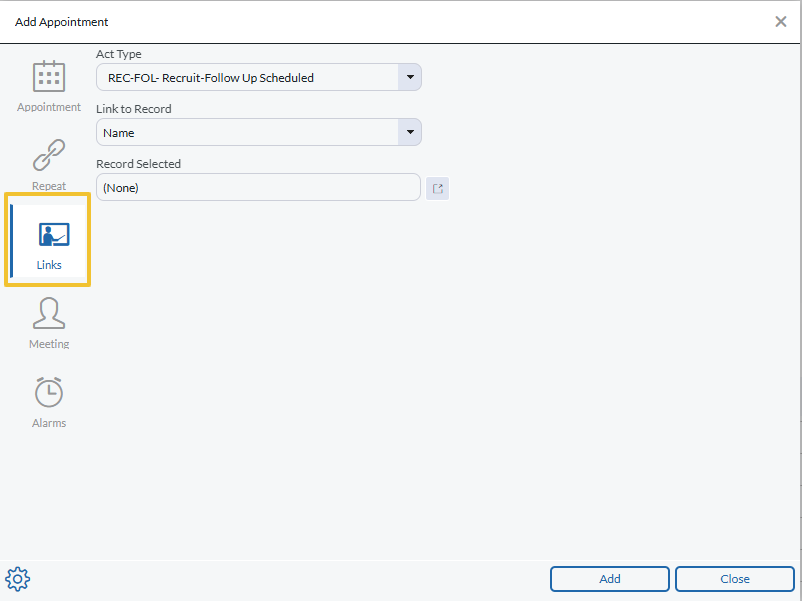
To link the appointment to a record #
- Click the Links charm on the left. Select the Act Type on the dropdown menu.
- Select the type of record or Rollup (Company, Name, or Position) in the Link to Record dropdown.
- Click the arrow button to the right of the Record Selected dropdown and perform a search for the record/Rollup. Once the record/Rollup is selected, the name displays in the Record Selected field.
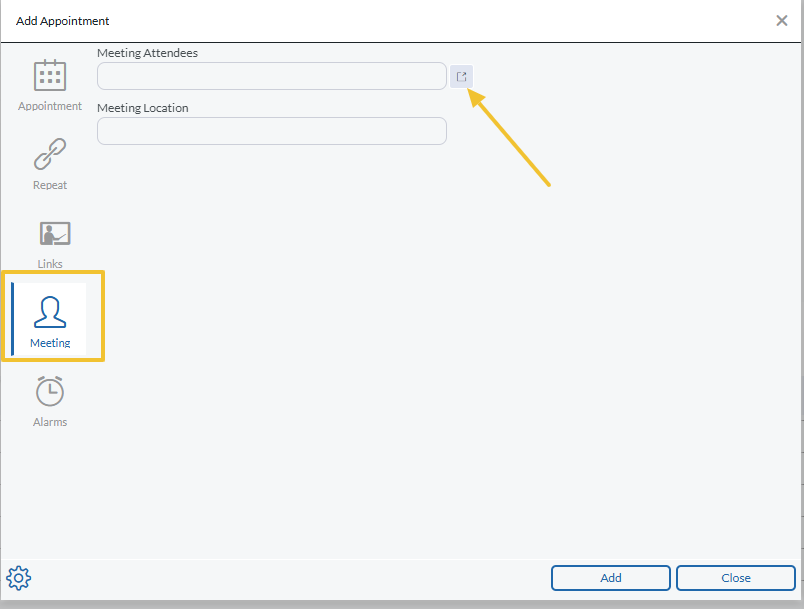
To scheduling a meeting #
- Click the Meeting charm on the left. Click on the arrow button to right of the Meeting Attendees field. This will open a window in which you can select attendees from your database. If you don’t have an Address Book created, use the Search tab to search for any name record in your database. The selected individuals will receive an email in which they can reply “Accept”, “Decline”, or “Tentative” to your invitation. The Subject entered will be the subject of the email, and Notes will become the body of the email.
- You can also specify the Meeting Location.
- Click Add.
Utilizing Calendar Alarms #
PCR contains internal Calendar Alarm notifications that will allow you to be notified of upcoming appointments right from within the software. These calendar alarms can be set up when scheduling an appointment, adding an activity, or from within the Pipeline.
Enabling Calendar Alarms #
In order to set up calendar notifications you will need to first ensure that they are turned on. This can be done by following the steps provided below.
- Navigate to the Schedule by clicking on the Calendar icon on the main toolbar.
- Clikc the gear icon on the task bar of the upper pane, above the Calendar itself.
- Ensure that the “Show Alarms” checkbox is selected. (This setting controls all Calendar Alarms within the software).
- Click close to dismiss this window, your calendar alarms have now been enabled.
Interacting with Calendar Alarms #
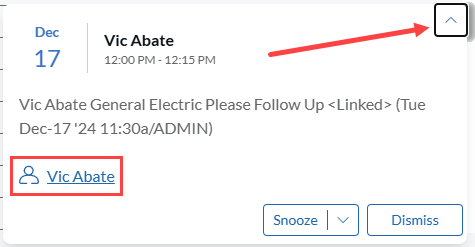
Calendar Alarms will appear in the bottom lefthand corner of your screen. These alarms will display the Date, Time, Linked records and notes for the scheduled event. Additionally you can interact with the alarms in the following ways.
- Click the arrow icon in the upper right of the alarm to maximize it and display any notes or linked records that are attached to this appointment. This is very useful if you want to be reminded to call a record in the database at a specific time as you can simply click on their name to open their record.
- Click the Snooze button on the alarm to temporarily clear the alarm for a selected amount of time. The alarm will reappear after the selected amount of time has passed.
- Clicking Dismiss will remove the alarm and cause it to not pop up again in the future. Please note that these alarms cannot be recalled once dismissed, however, the Calendar event will still be present.
- If multiple Alarms appear at once they will stack and can be scrolled through to view them all.
Editing an appointment on the schedule #
- Open the schedule and go to the day on which the appointment has been placed.
- Find the appointment in the day’s list of appointments and click the “chat bubble” icon to view a menu of options.
- Click Edit.
- Edit Date, Time, Subject, Notes, Repetitions, Activity Type, Meeting Information, Alarm, or Event Type Color.
- Click Save.
**Please note that if you edit an Appointment that included attendees, each attendee is automatically sent an email with new meeting information.

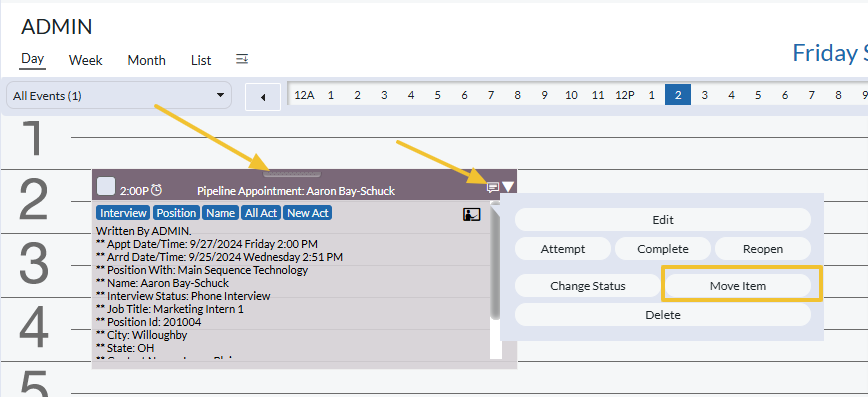
To move a single appointment #
Items on the enhanced daily schedule are draggable. Use the ‘grip strip’ at the top of any colored box in your Schedule to click and move the item.
- Open the schedule and go to the day on which the appointment has been placed.
- Find the appointment in the day’s list of appointments and click the “chat bubble” icon to view a menu of options.
- Click Move Item.
- Edit Date, Begin Time, or End Time.
- Click Move.
To Search the Schedule #
- Open the Schedule.
- Click the Search tab in the navigation menu at the top left of the Schedule.
- Edit the Begin Date and End Date as necessary.
- Enter the Search Criteria text (i.e. enter a candidate’s last name).
- Click the Run Search action button in the action menu (magnifying glass icon).
- The search results will display by date.

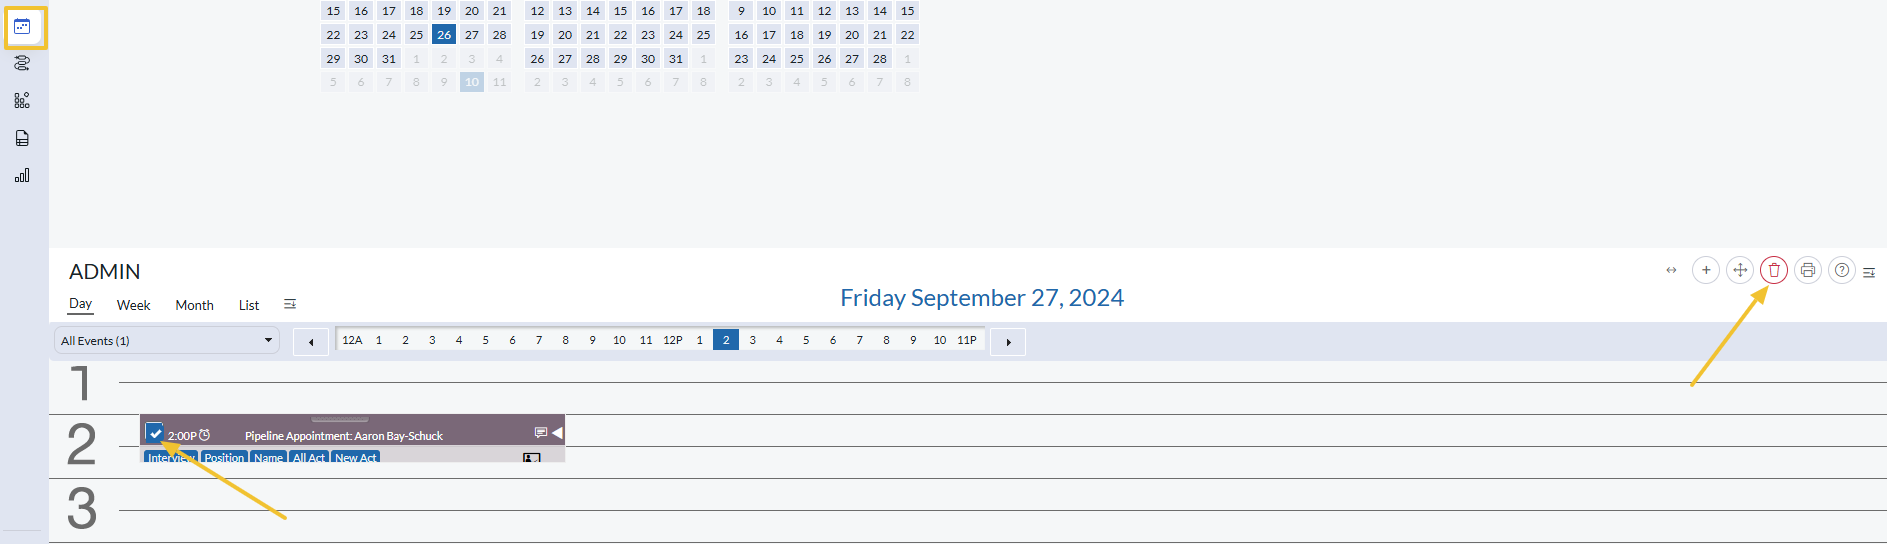
To delete an appointment #
- Open the schedule.
- In the bottom frame, checkmark the appointment.
- Click the Delete action button in the action menu (trash can icon).
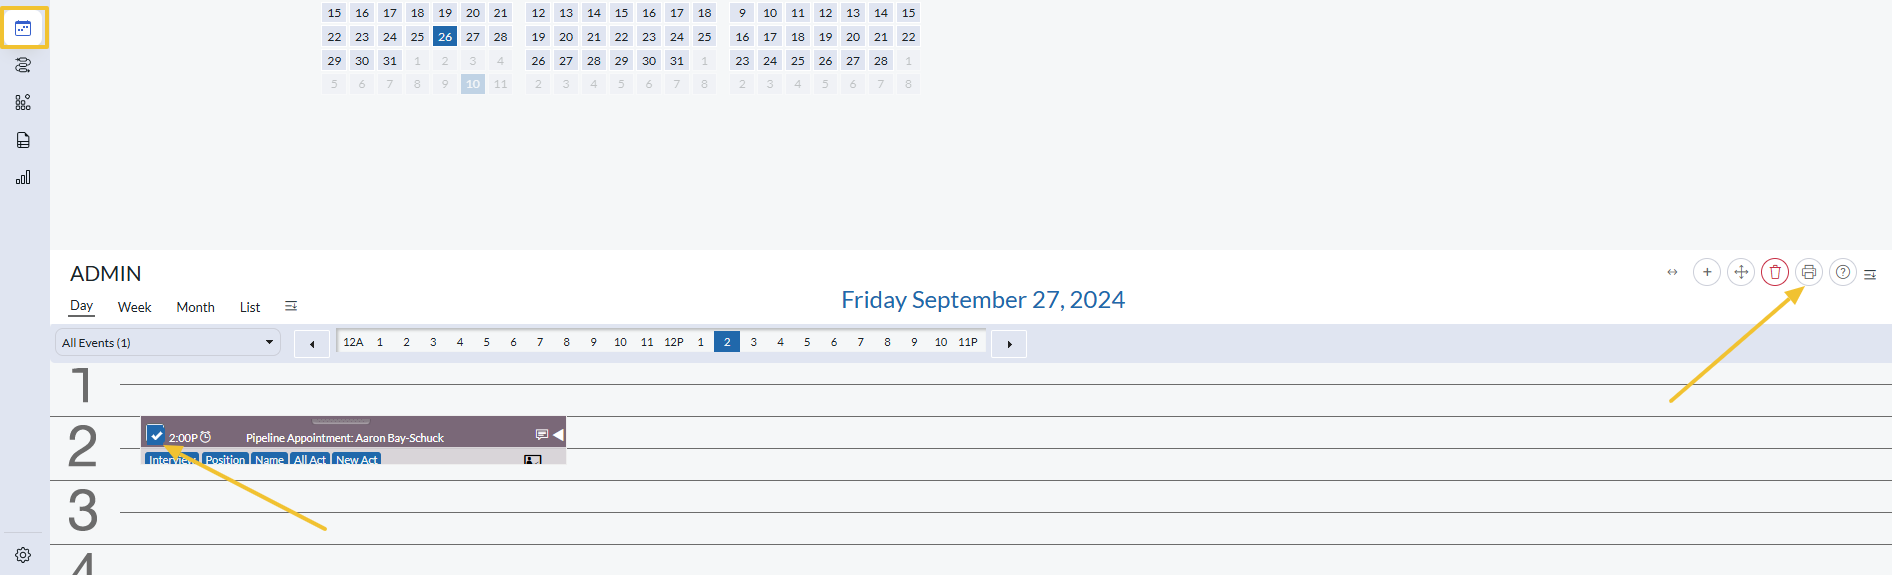
To print the schedule #
- Open the schedule.
- In the bottom frame, checkmark the appointment.
- Click the Print action button in the action menu (printer icon).
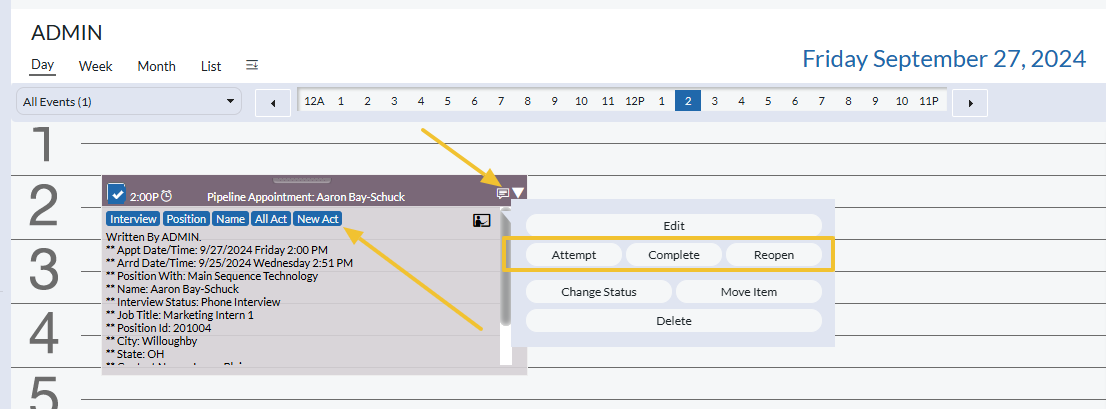
Attempting and Completing Appointments #
- Open the schedule and go to the day on which the appointment has been placed.
- Find the appointment in the day’s list of appointments and click the ‘chat bubble’ icon to view a menu of options.
- Do one of the following:
- Click Attempt if the item was attempted. An empty circle icon will be added to the appointment as a visual indicator that the appointment has been attempted.
- Click Complete if the item was completed. A filled circle icon will be added to the appointment as a visual indicator that the appointment has been completed.
- Click Reopen if the item was marked attempted or completed and you want to remove this status. The circle icon will be removed.
- If the item is linked to a record, double click to expand the appointment, then click the New Activity link to add a new activity to the record.