Table of Contents
Once you have configured your Email Alias, you can send emails directly from PCRecruiter. You’ll find email icons throughout the system. Each location is listed below with specific options and instructions.
From a Name Record: #
- Open the record you would like to send an email to.
- Click the Contact
icon.
- Select Email. If multiple emails exist on a record hover over email to select which email you wish to use.
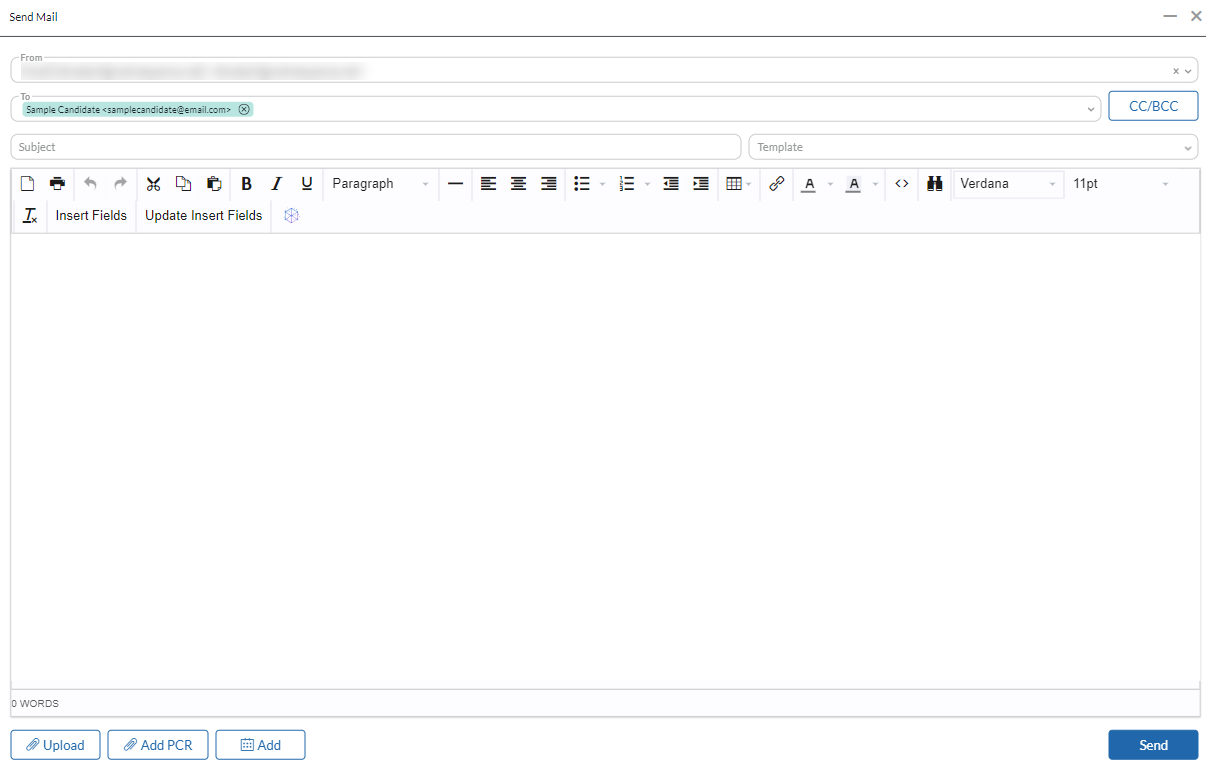
- The Send Mail window will open, here you can compose your email to the candidate.

Below are the sections within this screen:
- Email
- From: Select from your Email Aliases as defined under System > Email Setup
- To / CC / BCC: Enter the recipient(s). The Email icon at the right of these fields will allow you to search for recipients within the database by Last/First Name, or to use a Rollup as an Address Book (see the ‘gear’ icon within the Email Search popup to select lists).
- Subject: Enter your subject here.
- Template: Select a Form Letter from the dropdown list to populate a pre-built email template.
- Body of email: This area is for the actual email content you wish to send. Emails can also contain Insert Fields which automatically pull information from the name record in your database, such as first name. Once the insert fields have been inserted you can click update insert fields to view the information that is pulled from the record.
- The AI Email Generator icon is also available here.
- Attachments — Use this panel to attach one or more documents from your computer to the email.
- PCR Files — Use this panel to choose Global, Name, or Company attachments related to the record to the email.
- Add Meeting Request: Allows you to attach a meeting request to the email, also places this meeting your calendar.
From the Name Record Workspace tab: #
- Open a Name Record
- From a Candidate Field List with an email click on the Mail Icon
to send an on the fly email to the candidate.
- Click the Form Letter Icon
to send a pre-built template to the Name Record.
From the Name Record Details Tab: #
- Open a Name Record
- Click on the Details Tab
- Locate the desired email address and click on the Mail Icon
to send an on the fly email to the candidate.
- Click the Form Letter Icon
to send a pre-built template to the Name Record.
From the Search Grid: #
- After running a record search locate the desired email you wish to send a letter to.
- Click on the email to open up the Send Mail window. (This will work for both pre-defined and custom email fields)
- You can also click on the actions icon to send an on the fly email.
Other Locations #
In addition to the above options emails can be sent from a number of areas within the system. Click on each area for more information.
- Position Records from the search grid or the Workspace/Detail tabs to email position contact.
- From a Pipeline add step window or the name record card action menu.
- From the Rollup List actions icon.
- From both Simple and Advanced Sequencing.
