Automations are comprised of Triggers and Actions which can perform a variety of time-saving tasks. All Automations will consist of a Trigger; which is an event that causes an Automation to run, and an Action which is what will happen when the trigger occurs.
To configure Automations in your database you must be a Full System Administrator.
Canned Automations #
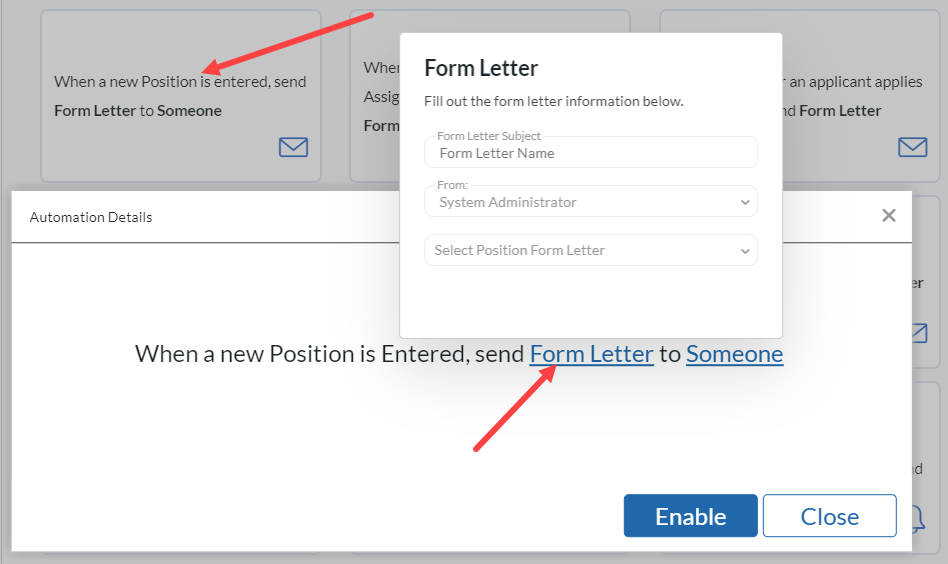
The system comes pre-loaded with ‘canned automations’ for common tasks like sending a Form Letter when a new Position is created, adding or removing a record from a list if it contains a specific field value, sending a notification when a Contract assignment is about to end, or when a new applicant arrives via the Job Board.
- Select Settings from the Main Menu
- Select Database Setup
- Choose Automations
- A grid of template automations appears. Click the canned automation you’d like to enable.
- In the popup, click each of the underlined items to set the details of your particular automation.
- Click Enable when finished to activate the automation.

Custom Automations #
In addition to the Canned Automation Templates, you also have the ability to build a Custom Automation. This is done by doing the following:
- Select Settings from the Main Menu
- Select Database Setup
- Choose Automations
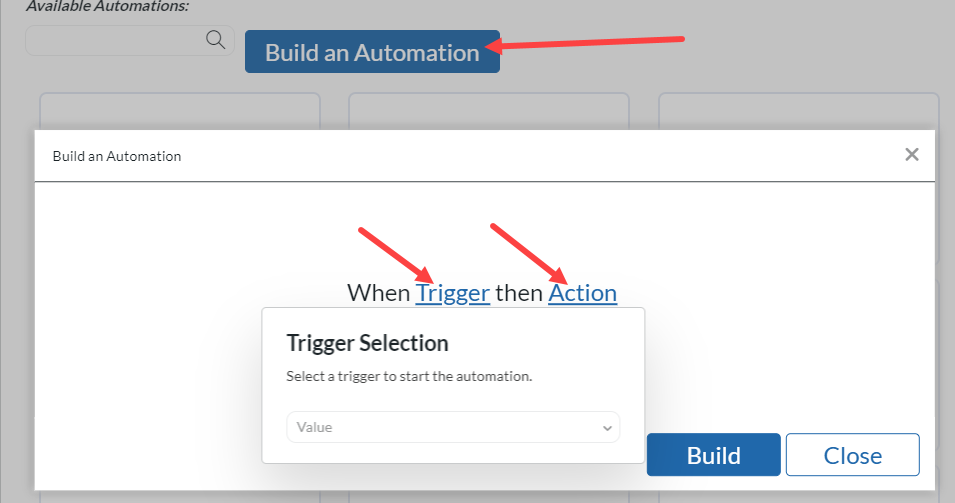
- Click Build an Automation
- Click Trigger
- Choose your desired Trigger from the dropdown
- Click Action
- Choose your desired Action from the dropdown
- Click Build
- The words Trigger and Action have now been replaced with the Trigger and Action you chose. Click the Trigger
- Make the appropriate selections for the selected Trigger
- Click the Action
- Make the appropriate selections for the selected Action
- Click Enable. Your Automation is now enabled moving forward.

Actions & Triggers #
The available Actions for most triggers are as follows, with exclusions noted at the bottom of the Triggers list below:
- Send Form Letter
- Notify
- Add to Rollup
- Remove from Rollup
- Write Activity (Includes Result Code)
The Triggers are listed below:
- A new Position is created †
- A Contractor is coming off Assignment in [Number of Days]
- A Candidate has not been linked to a position after [Some Time] ‡
- A Permanent Placement is made ‡
- [Some Time] after a Permanent Placement is made ⸸
- A Contract Placement is made
- [Some Time] after a Contract Placement is made ⸸
- An applicant applies to a Position
- A Contractor has not submitted their timesheet [Number of Days] [Before/After] it is due ⸸
- [Some Time] after an applicant applies to a Position ⸸
- [Field] is [Value]
- A Candidate updates their record through Job Board
- [Activity Type] is written
- A Contract Placement Start Date is reached
- [Number of Days] [Before/After] a Contract Placement Start Date is reached
- A Permanent Placement Start Date is reached
- [Number of Days] [Before/After] a Permanent Placement Start Date is reached
- [Number of Days] [Before/After] an [Activity Type] Date is reached
- [Number of Days] [Before/After] a [Field] Date is reached
- A [Field] Date is reached
- A [Field] Date Anniversary is reached
- A Record is Added to [Rollup]
- A [Position] Pipeline has not been added to in [Number of Days]
- An active position’s Pipeline has not been added to in [Number of Days]
- [Activity Type] has not been written to a newly created record after [Some Time]
† Excludes Remove from Rollup Action
‡ Excludes Send Form Letter Action
⸸ Excludes Add to Rollup, Remove from Rollup, and Write Activity Actions
NOTE: “Timesheets” features are not currently available in this version.
Automation Details #
Most of the available automations are fairly straightforward, but there are some that have some specifics that should be noted.
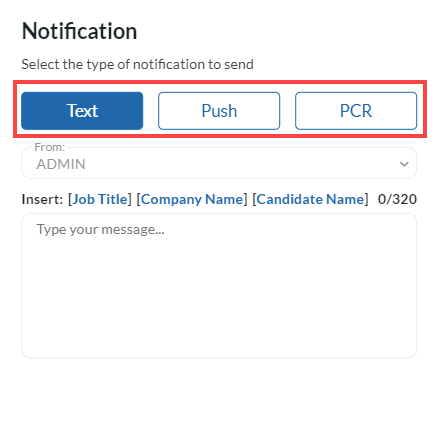
- The Notification Action consists of three options:
- Text: A text will send from the selected “From” username. The user must have RingCentral setup for their PCRecruiter User to utilize this feature.
- Push: A push notification will send to the mobile device of the selected “Someone”. This person must have the PCRecruiter Mobile App Installed (And be Logged into it) on their mobile device to utilize this feature.
- PCR: A PCR notification will send an internal pop up to the user that only shows when logged into PCRecruiter. These Notifications will appear as a fly in notification in the lower right corner of the screen and are stored in the Notification Pane.

- For some of the Contractor Automations such as “A Contractor is coming off Assignment in [Number of Days]” the automation needs to scan your database at a defined interval. By default, this scan runs daily at 8 AM. If you would like to modify this, hover over the Enabled automation and click the Schedule icon in the lower right corner. A window will appear allowing you to specify when you would like it to run.
- The specified time will always be in relation to the time zone of the user that created the automation. So if it is created by a user in the Eastern time zone, a user on the West Coast will see the automation as 5 AM Pacific.


- If you have an automation using the Predefined Name Status, Position Status, or Default Company Field; you will need to use the associated letter rather than spelling out the Status:
- Name Status
- A (On Assignment)
- C (Candidate)
- E (Employee)
- I (Internal)
- H (Hiring Authority)
- M (Manager)
- O (Offer Accepted)
- P (Placed)
- T (Contractor/Temp)
- D (Developed/Qualified)
- S (Submitted)
- U (Unverified)
- Position Status
- A (Available/Open)
- F (Filled)
- I (Internal Only)
- P (Pending)
- H (Hold)
- C (Closed)
- Default Company Type
- Name Status
Pipeline Automations #
Automation Plans can be set to take place at a future date, time, and/or day. This functionality can be applied to Pipeline Automation Plans. Once the automation plan is triggered, it will not be run until the selected scheduled date, time, and/or day.
For more information on setting up automation plans, check out the article pertaining to the automation plan you wish to setup:
