The primary “Add” button can be used for:
- Adding Names
- Adding Companies
- Adding Jobs
- Adding Rollups
- Adding File Attachments
- Importing a list of Records
This feature will create one or more ‘draft’ records, which can be added to existing records in the database, linked to other draft records, and otherwise adjust prior to saving them. Until the Add Records button has been clicked, these draft records will not be stored in your database.
Adding Records #
To begin, click the Add (+) button, which is found at the top right corner of the PCR screen, to the right of the Search area.

Once you have begun adding a record, either by importing data or selecting a record type, the dialog that appears will be divided into two halves; the left side will display a list of the items to be added and the right side layout shows the details of the currently selected record draft. All records will remain in draft form until you have clicked Add records.
The division between the left and right sides can be adjusted by dragging the handle (dots) in the center of the vertical dividing bar or by clicking the arrow at the bottom of the bar.
Within the left side, you’ll see six columns:
- Type — Indicates whether the item to be added is an Attachment, Name, Company, Position, or Rollup
- Name — The name of the record or file to be added.
- Source — Indicates whether the item was uploaded, parsed from an uploaded document, or manually entered.
- More Options — Three-dot menu containing the Remove option for the specified item, which will cancel adding it to the database. For Name, Company, and Position records, this menu also contains a Check for Duplicates option.

Add Names with Resumes #
The system can extract contact information from the header on a resume to save time and errors during record creation. There are two methods of accomplishing this:
As long as the ‘Add Record’ dialog remains open, you can click-and-drag files from your computer into this area. Note that, although the ‘Drop files here to import records or attachments’ message only appears when no draft records have been created, you can continue to drag additional items into the dialog even after generating drafts.
- Click the Add (+) button in the top bar. This opens the Add Record dialog.
- Drag one or more resume files from your computer into indicated area, or use the Upload link to browse for a single document.
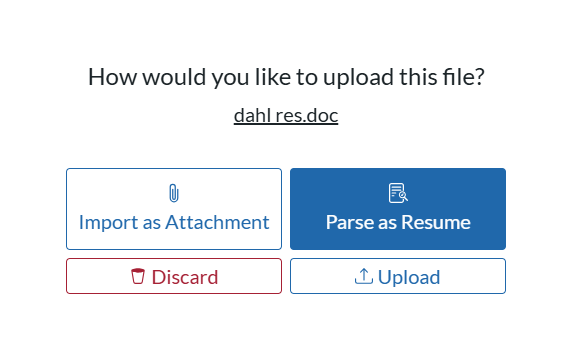
- In the Import Document prompt that appears, click Parse as Resume.
- If multiple resume files were dragged into the area, the Import Document page will list all of them at once. An option must be selected for each file before proceeding.
- Once all options have been chosen, click the upload button
- Click on the Name in the list and make any desired adjustments to the record.
- When you are ready to finalize your draft(s), click Add Records to add them to the database.
Add Names, Companies, Positions #
In addition to parsing resume contact details to generate a new record, you may also use the Add Record screen to create Name, Company, or Position records.
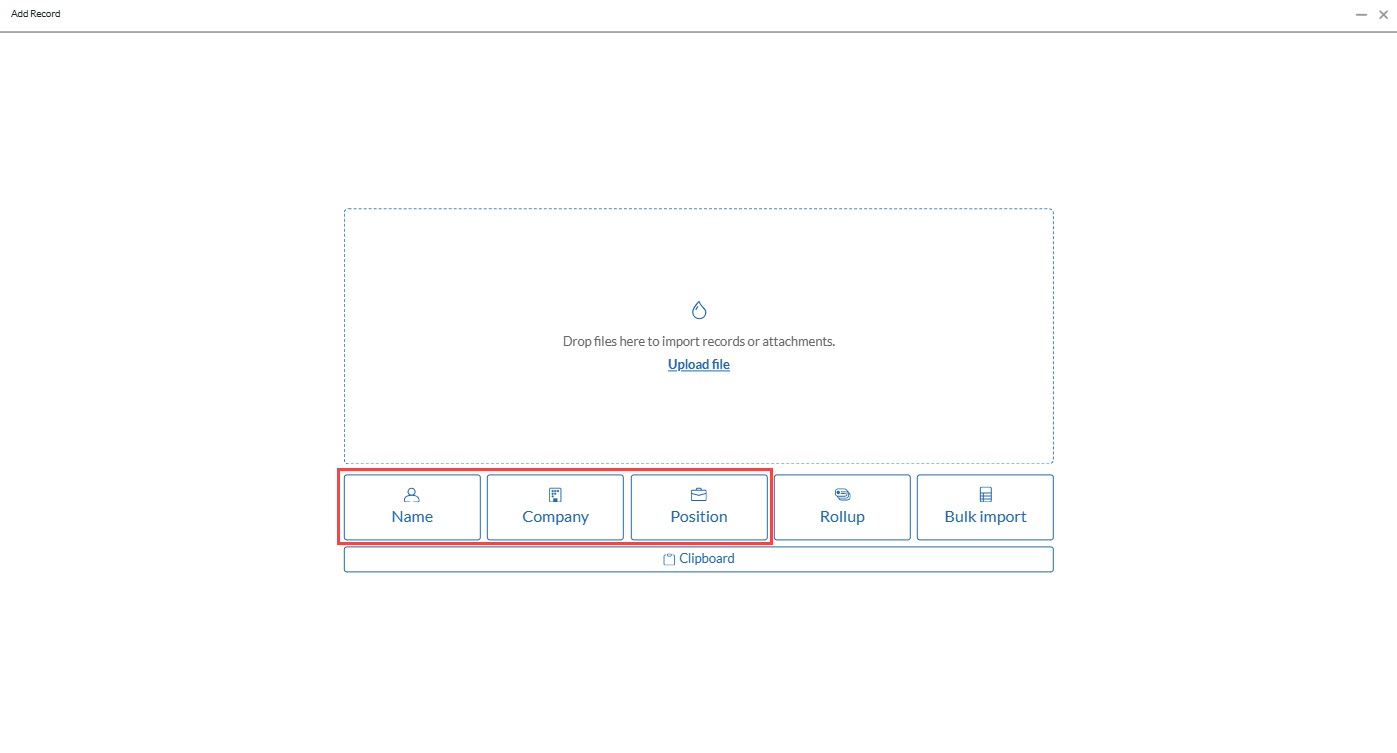
- Click the Add (+) button in the top bar. This opens the Add Record dialog.
- Click Name, Company, or Position to create a blank draft record of that type.
- Edit the contents of the draft.
- When you are ready to finalize your draft(s), click Add Records to add them to the database.
Add from Clipboard #
The clipboard feature can quickly parse contact information (Name, Email, Phone, Title, etc.) blocks from a directories, websites, email signatures, and so on into multiple fields at once. The accuracy of the data parsing will vary depending on the information in the clipboard. Review carefully before saving.
- Click the Add (+) button in the top bar. This opens the Add Record dialog.
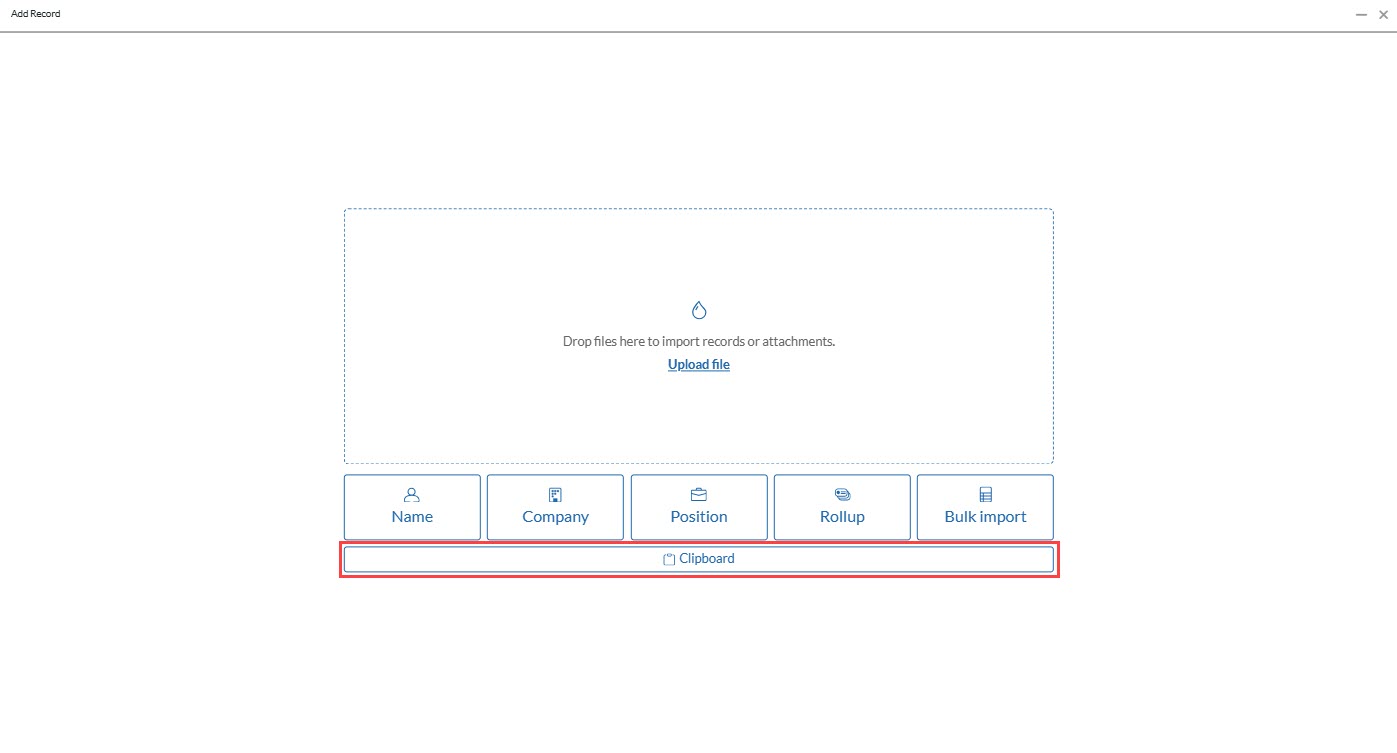
- Click Clipboard
- Choose whether to add a Name or Company
- The system will attempt to populate the Draft record from the data in your clipboard.
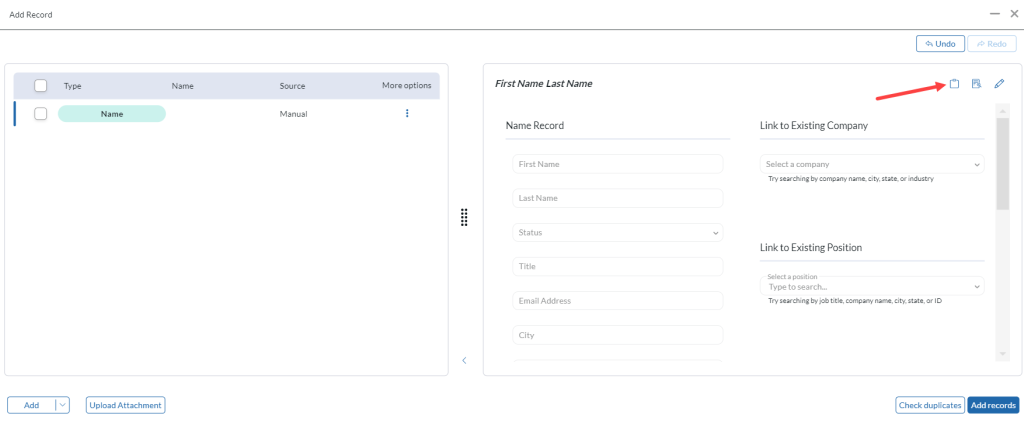
If you have already opened the Add Record area, you may also use the Clipboard icon at the top right corner of the draft record to parse from your Clipboard into the currently open draft.
Add Rollup Lists #
The Add Record dialog can also be used for generating new Rollup lists to group records together.
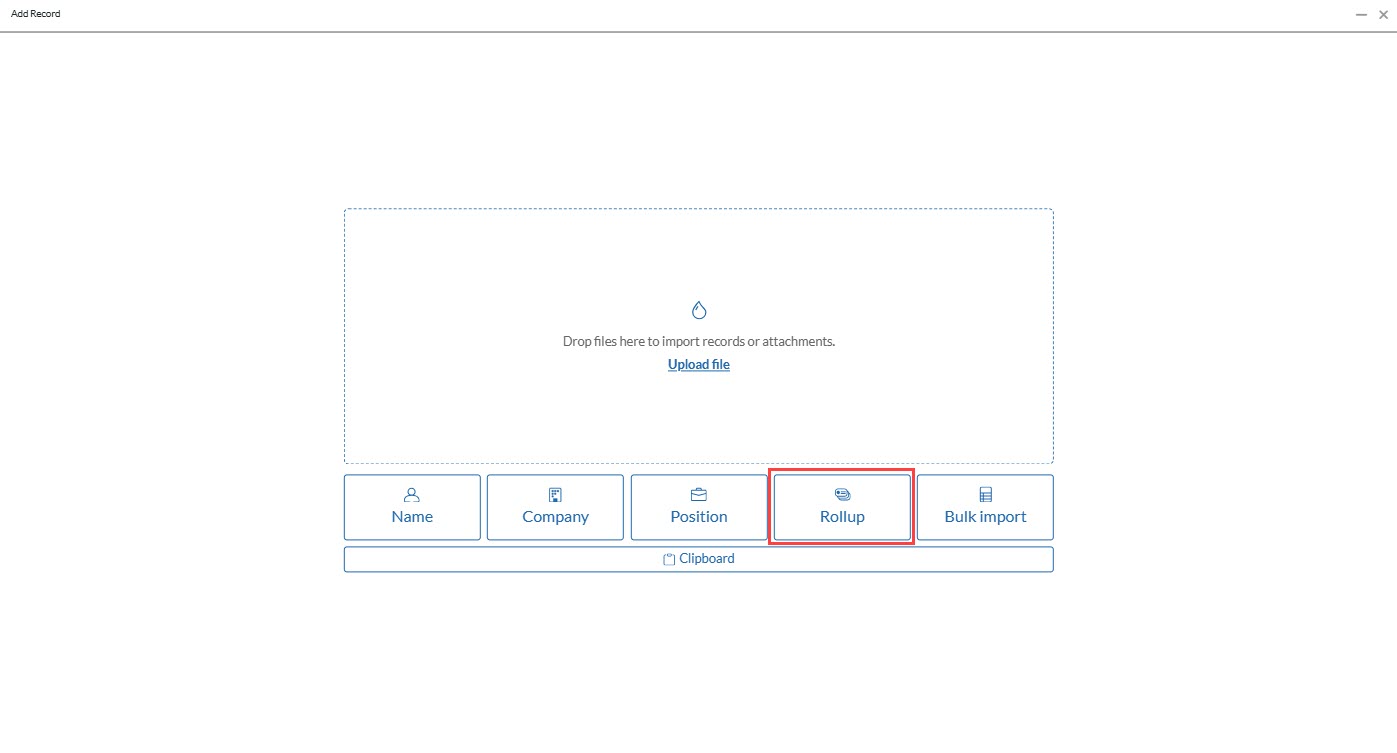
- Click the Add (+) button in the top bar. This opens the Add Record dialog.
- Click Rollup
- In the draft Rollup List screen, complete the details:
- Name: The name by which this list will be recognized throughout the system (up to 20 characters)
- Description: Describe the purpose or content of this list.
- Username: The primary user or owner of the list. When opening Rollups, the system will display the user’s own lists first.
- When you are ready to finalize your draft(s), click Add Records to add them to the database.
Add Attachments #
The Add Record dialog can be used for uploading one or more attachments.
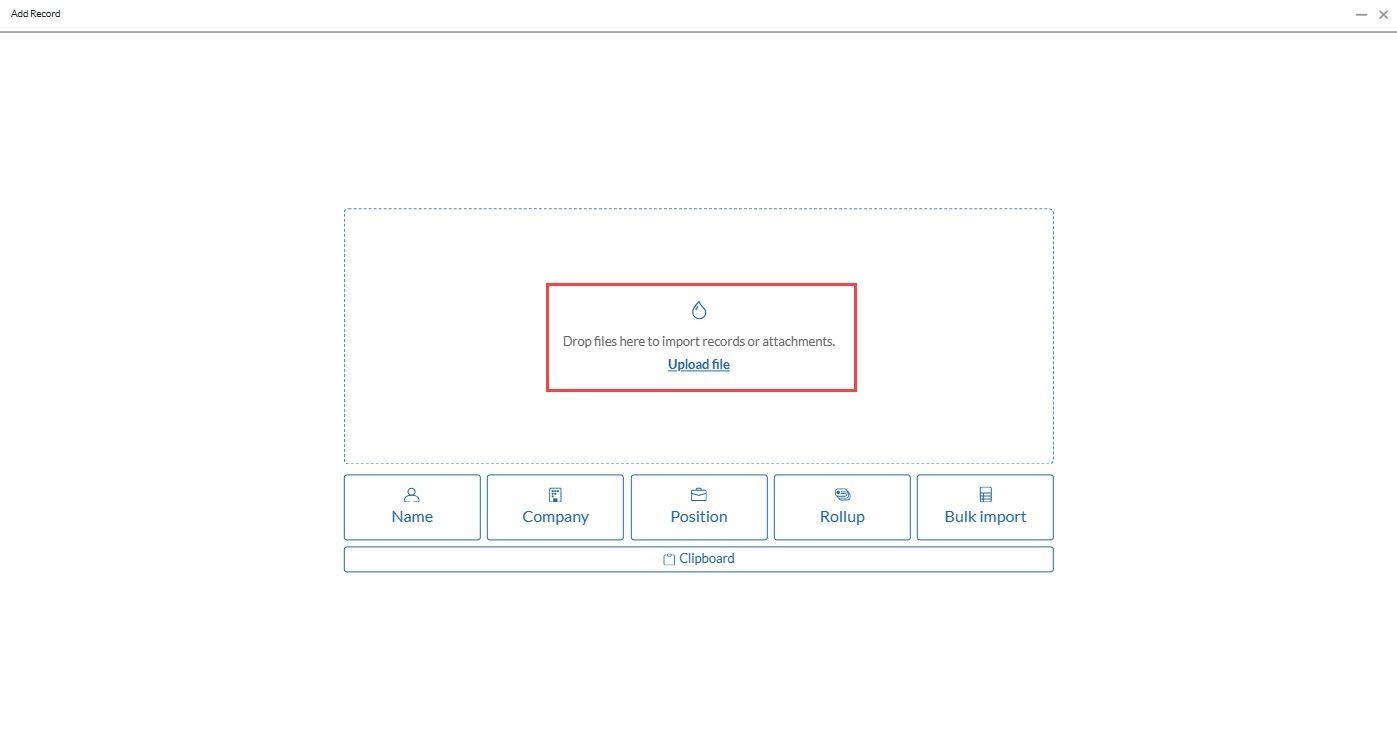
- Click the Add (+) button in the top bar. This opens the Add Record dialog.
- Drag one or more files into the dialog window, or use the Upload link. Note that, although the ‘Drop files here to import records or attachments’ message only appears when no draft records have been created, you can continue to drag additional items into the dialog even after generating drafts. In the Import Document prompt that appears, click Import as Attachment.
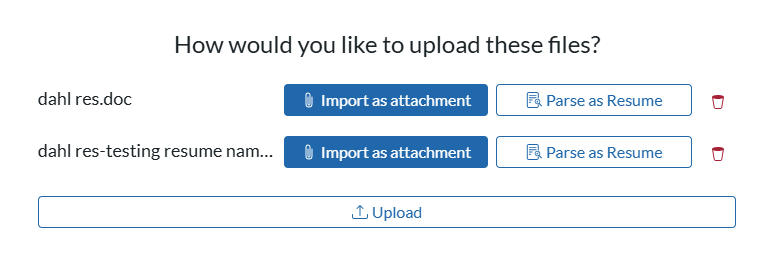
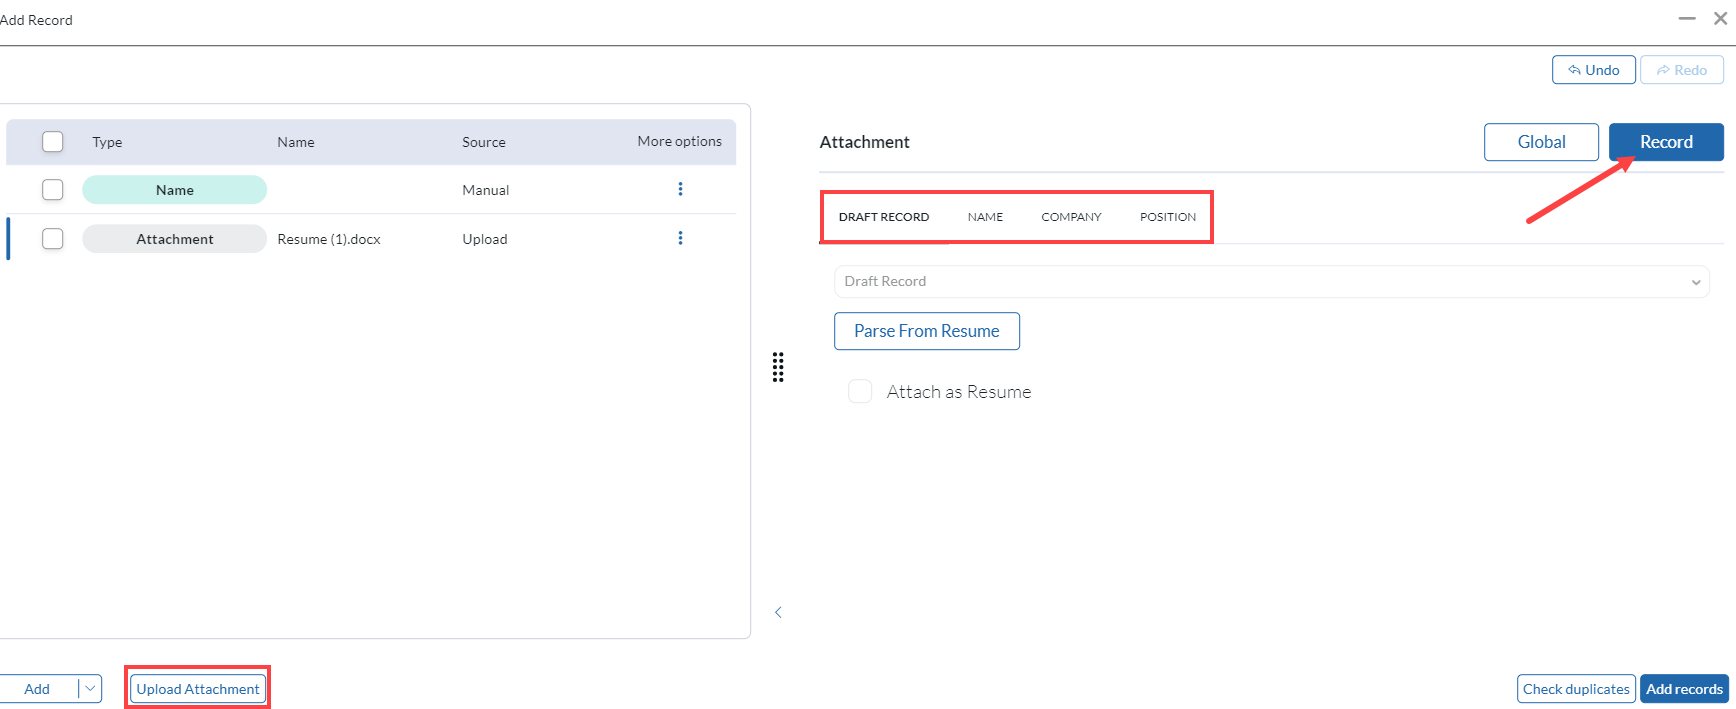
Newly imported Attachments will be treated as Global unless otherwise specified, meaning that they can be reached from the Attachments area of any record in the database. To attach an uploaded file to a specific record:
- Click on the attachment in the file list on the left side of the Add Record dialog.
- Click the Record button at the top right corner of the dialog.
- The Draft Record box will allow you to select one of the current draft records to attach this file to. Alternatively, click on the Name, Company, or Position tabs within this area to search for an existing record to attach this file to. Please note that if you upload wish to change an attachment to a resume you can click the Parse from Resume button from the record screen.
- When you are ready to finalize your draft(s), click Add Records to add them to the database.
Linking Records & Files #
When adding multiple records, the records will be independent of each other. In some cases, you may wish to create related records — such as a Name and the Company it belongs to — simultaneously. To indicate linked records:
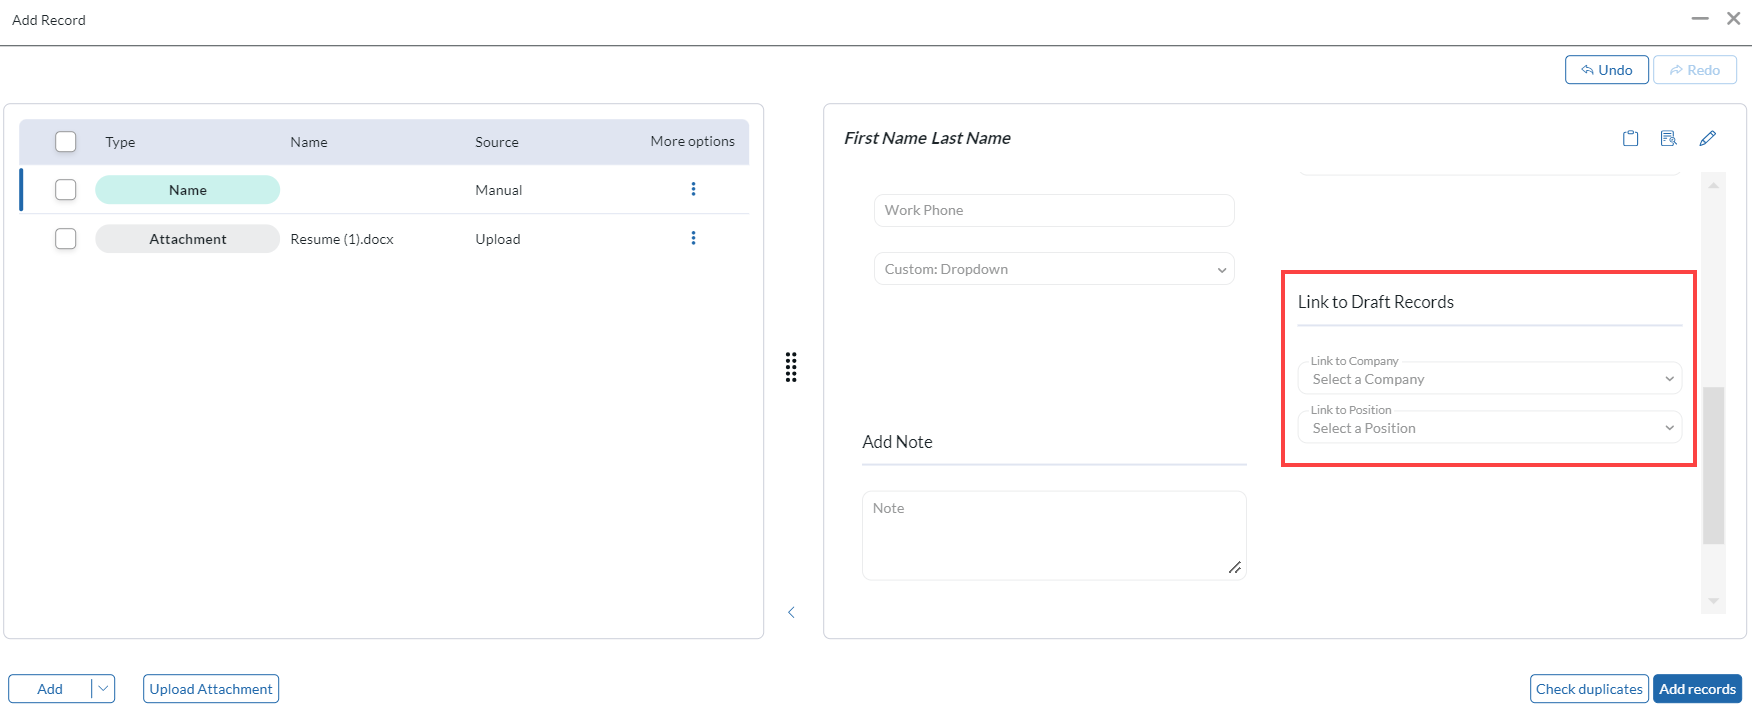
- Click on any draft record in the list on the left side of the Add Record dialog.
- In the layout on the right, locate the Link to Draft Records dropdowns.
- Using the dropdowns, connect the record to other current drafts.
- If you wish to link the draft to a record that has already been saved in the database, look for the Link to Existing dropdown rather than the Link to Draft options.
- When you are ready to finalize your draft(s), click Add Records to add them to the database.
Similarly, when adding a new Rollup, you may add drafts to the list at the same time:
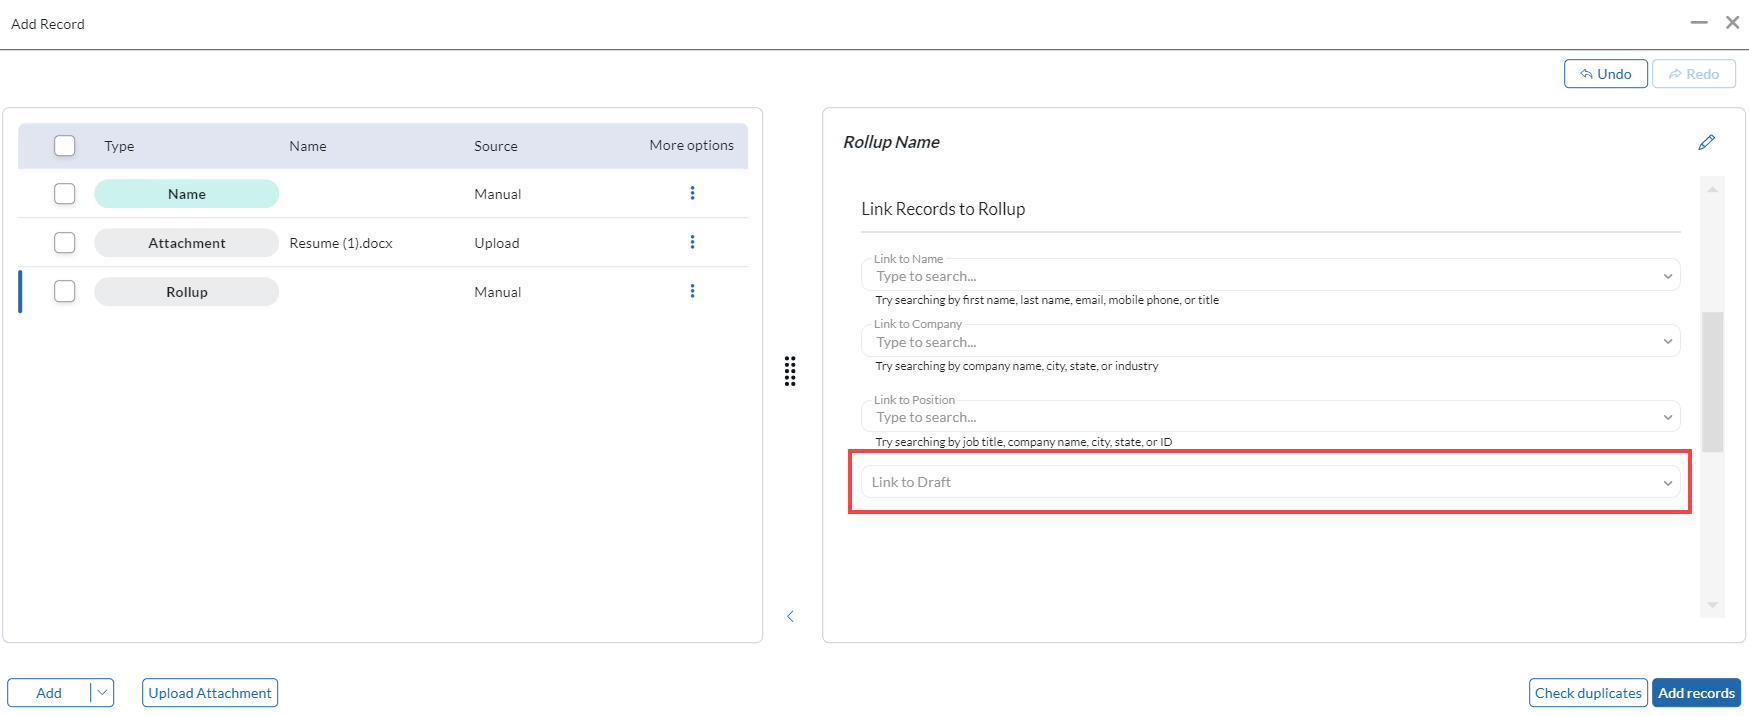
- Click on any Rollup in the draft record list on the left side of the Add Record dialog.
- In the layout on the right, locate the Link Records to Rollup option.
- Click Link to Draft and select a record.
- Click Link Record to confirm.
- Repeat these steps to link more than one draft to the list.
- After adding, you may use the ‘x’ to the right to remove.
- Use the Link Name / Company / Position Record buttons to search for and link any existing records to the list.
More Options #
If at any time you wish to Undo or Redo a change while using the Add Record dialog, you will find these buttons at the top right corner of the dialog.
If you wish to remove a draft, click on the three-dot menu icon under More options next to any item in the list and choose Remove.
If you wish to remove multiple draft records, use the checkboxes on the record list and then use the Delete button that appears below.
Check Duplicates #
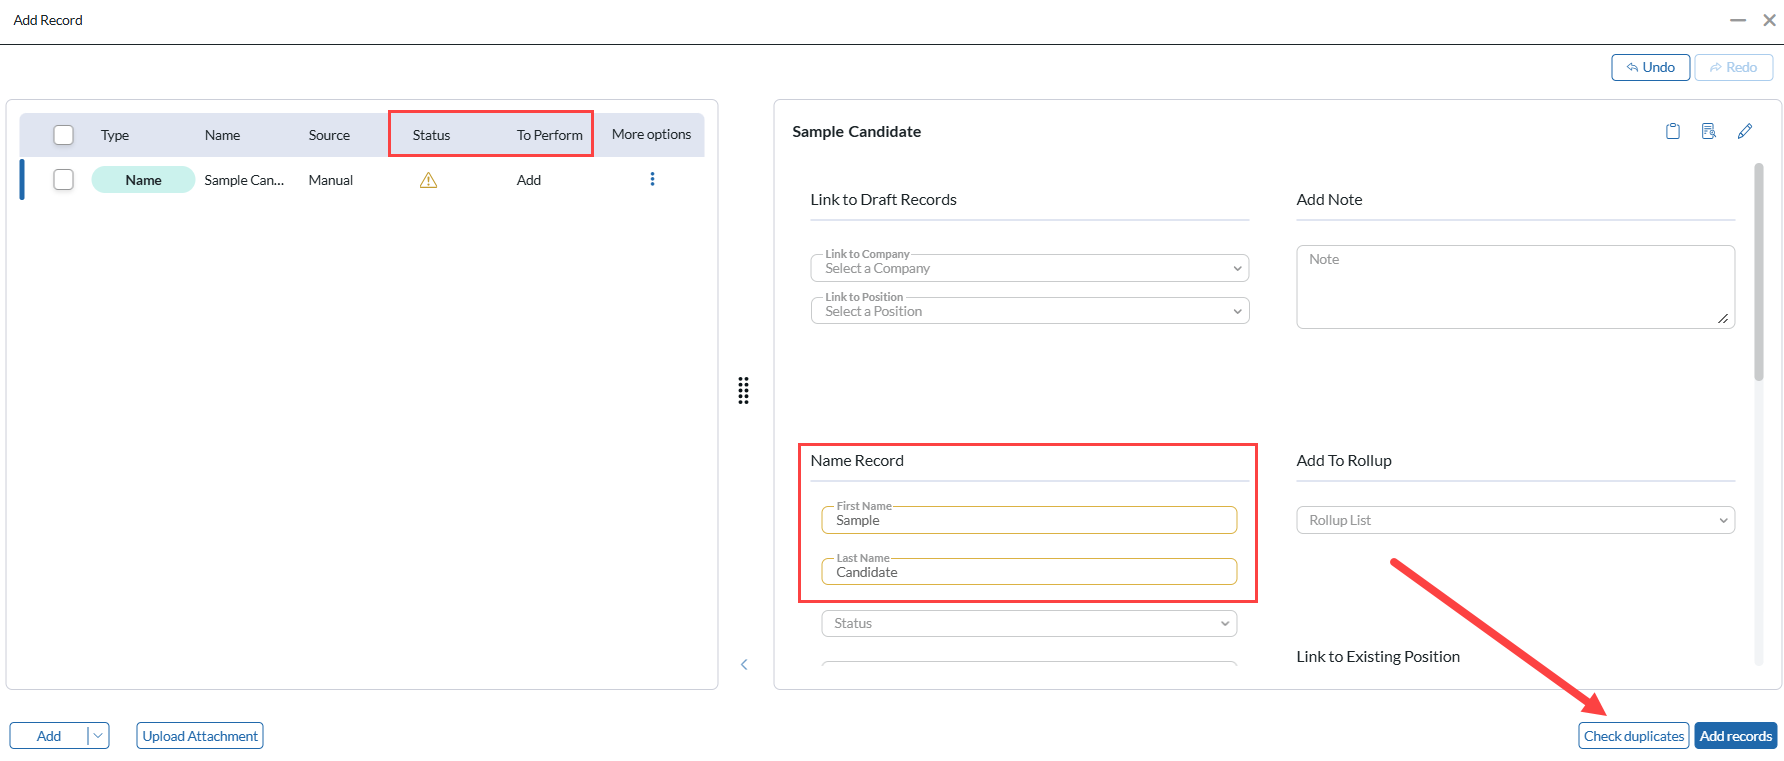
At the lower right corner of the Add Record area is a Check duplicates button. This will compare the records being added to those already in the database (This can only check 10 records at a time). After checking, two new columns will appear on the left side of the Add Record window:
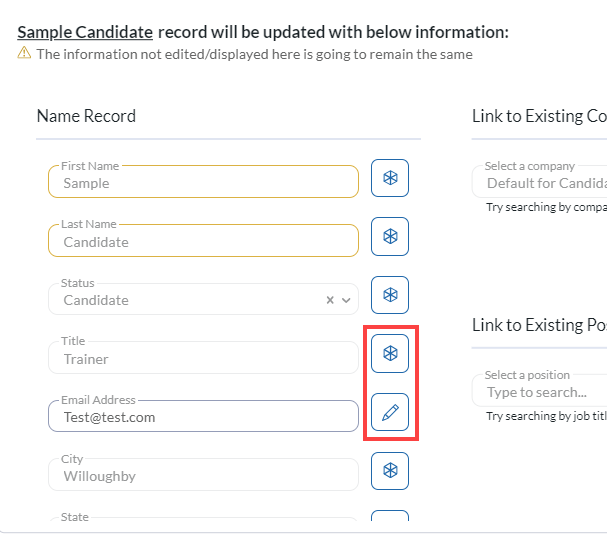
- Status — This column indicates the outcome of the duplicate check for this item. A circle/checkmark indicates that no duplicates were found. A triangle/exclamation indicates a potential duplicate. Clicking on the duplicate symbol will open a list of potential duplicate records. From here you can either remove them or click the update icon to update that record with the information you’ve entered. The information you’ve updated will be shown by the pencil icon while the information which currently exists on the record will show the PCR logo. You can switch between these values by clicking the icon next to the field.
- To Perform — This column, appearing only after using the Check duplicates function, indicates whether the item will be added as a new record or treated as an update to an existing record. Additionally you can select the checkbox to the left of the records you wish to run the duplicate check on and select check duplicates from the bottom of the draft record list.
Edit Layout #
The layout shown on the right side of the Add Record dialog can be edited to suit your desired arrangement of details and functions. This layout is independent from the layout(s) available when viewing or editing a record. Edits made here will only apply to the layout used while adding records in this dialog.
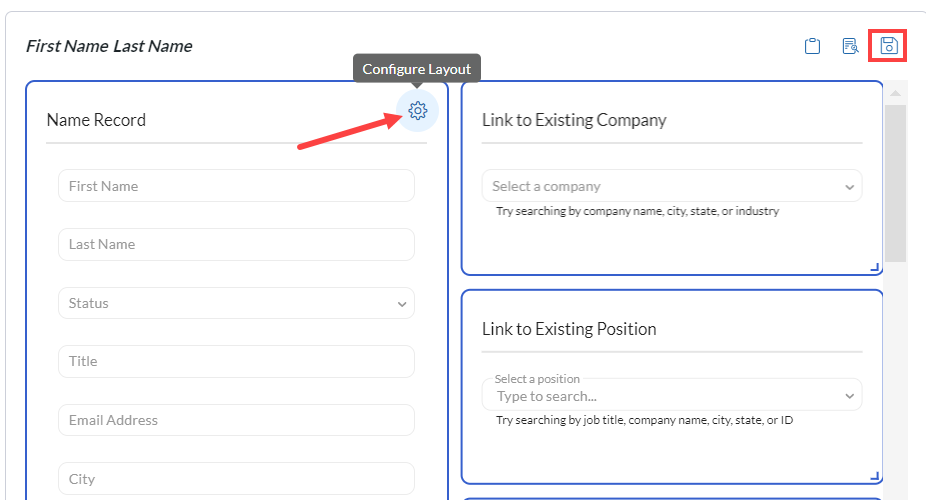
To edit your layout:
- Add a Name, Company, Position, or Rollup
- Select the draft from the list on the left side of the dialog.
- Click the Edit Layout button at the top right corner of the dialog.
- Adjust the layout using the standard methods for editing layouts and widgets.
- Click Save Layout to store the changes.
Bulk Importing Lists of Records #
Adding records can also be done by importing a CSV or MDB file. This allows the user to bring in large amounts of records without needing to manually add each one. To view the Bulk Importing article click HERE.
