What is Simple Sequencing? #
Simple Sequencing is a feature that enhances your productivity by creating a customized workflow for your users. Simple Sequencing is a Rollup list based tool which utilizes a combination of manual and automated steps that can be organized to match your workflow. The steps allow users to keep track of their daily tasks by working through the assigned steps for each name record within a specific Rollup list. The Sequence column from the list view allows for the user to know what tasks need to be completed for the day quickly as well as providing information for upcoming steps. There is also a Kanban/Card view for users to drag and drop records to skip or jump back to the correct steps Simple Sequencing allows a number of different types of steps to be chosen. Click HERE to see all the types of steps that can be configured in a Simple Sequence.
Important terms: #
- Rollup List: A Rollup is a list which allows you to group related Names, Companies, and Positions together for searching, sorting, reporting, and sequencing. Click HERE to learn how to create Rollup lists.
- Simple Sequence: Sequencing feature that is primarily linear and manual. Tasks are completed via the name record tab of a Rollup list grid view. This feature is quick and easy to set up and manage.
- Advanced Sequencing: Sequencing feature that allows for more complicated processes and automations. It utilizes a combination of triggers and conditions which can be based on candidate interactions and multiple workflows. Click HERE for more information on advanced sequencing and its capabilities.
- Tasks: Tasks are the action which is completed for each step in the Sequence. Sequencing tasks can be completed from the Advanced Sequencing tasks dashboard and the Sequence column within a Rollup list.
- Sequence Templates: Templates are pre-built Sequences that can be activated without having to create the steps from scratch. The template list includes both Simple and Advanced Sequence Templates.
- Sequencing Analytics: Metrics that track the completed steps in a Sequence and the status of records within that Sequence. These also show email step results such as opens, replies, ect..
Simple Sequence Permissions: #
- Sequencing Permissions can be set to limit users ability to view or interact with Simple Sequence tasks. For full detailed information on User Security click HERE.
- Below are the Sequencing Permissions and their corresponding behaviors for users regarding Simple Sequencing. Please note that users must also have Rollup permissions in order to leverage the Simple Sequencing feature.
| No Permission | Read Only | Add/Update | Full Permission | |
| Access Sequencing | X | ✓ | ✓ | ✓ |
| Execute Assigned Tasks | X | ✓ | ✓ | ✓ |
| View Sequence Overview and Templates | X | ✓ | ✓ | ✓ |
| Activate a Sequence | X | X | ✓ | ✓ |
| Pause/Resume a Sequence | X | X | ✓ | ✓ |
| End a Sequence | X | X | ✓ | ✓ |
| Create and edit Sequence Templates | X | X | ✓ | ✓ |
| Delete Sequence Templates | X | X | X | ✓ |
Simple Sequence Creation: #
- Navigate to the name record tab inside of a Rollup list.
- Click the Simple Sequence icon in the top right hand corner.
- Type in a name for your Simple Sequence and select the desired first step and step type from the icons listed (Details of icons and functions below).
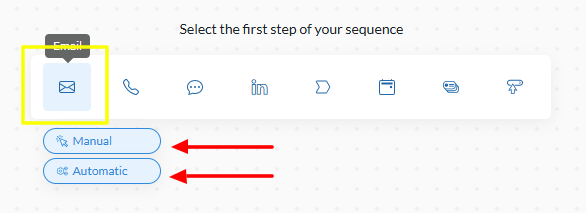
- Click on each step you wish to add in sequential order. You can also reorder the steps by dragging and dropping them to create your desired workflow.
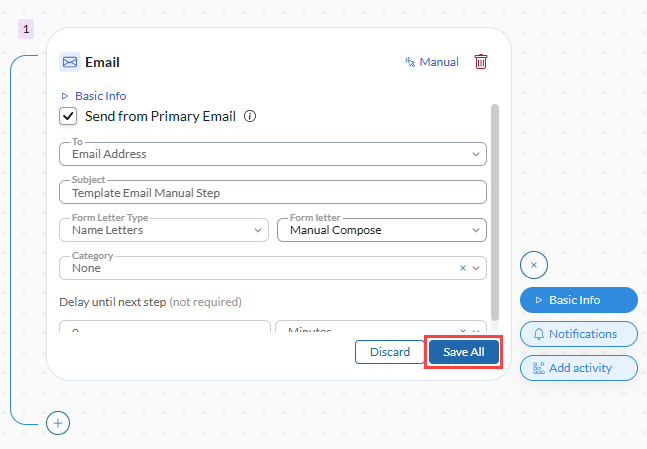
- Fill in all the required field information (Indicated by a red asterisk) for the Sequence type you have selected (Listed below)
- Note that not all fields are required, such as delay settings, but you will not be able to activate the Sequence without filling in required information.
- Steps can be renamed by hovering over the step name and clicking the pencil icon
next to the name. (This is not allowed for LinkedIn or Schedule steps).
- Each step can have PCR notifications and additional activities written upon completion of said step, but these are also not required.
- Steps can be renamed by clicking on the Pencil icon
to the right of the step name. (LinkedIn and Schedule steps cannot be renamed).
- Once all desired settings have been filled out click the save all icon. (This will confirm the information and check for errors in the step, must be done for all steps prior to activation.)
- Adding new steps can be done by clicking the add step icon
below a previously created step or by clicking the desired step type icon from the top right hand corner of the window, which will add the step to the end of the Sequence.
- Repeat this process until all desired steps have been added to your Sequence.
- Note that steps can be reordered by dragging and dropping them or by clicking the move up/down icons while hovering over the step.
- You cannot have 2 automatic steps back to back, there must be a manual step in between each automatic step. To set back to back automatic steps you will need to utilize the Advanced Sequencing feature.
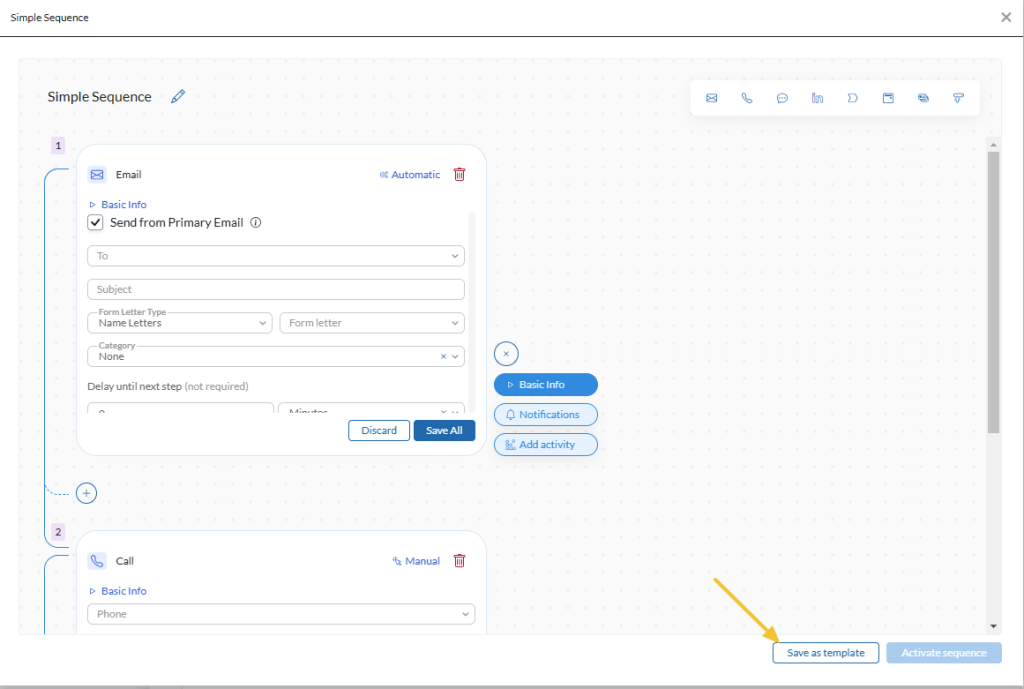
- Once completed you can either select activate to start the Simple Sequence or save as template to save this Simple Sequence setup for future use.
- The Simple Sequence is now complete and ready to be activated. After clicking activate you will need to follow the instructions below to begin the Sequence.
Simple Sequence Templates: #
Sequence templates can be created by following the above steps and clicking save as template prior to activation. Sequence templates allow for users to activate a previously built Sequence that has been saved in the system.
Simple Sequence Templates can be edited from the Sequence templates list which can be accessed in the following ways.
- From the Main Rollup screen by clicking on the Sequence templates button
in the upper right hand corner.
- From within a Rollup list by clicking the Sequence template icon.
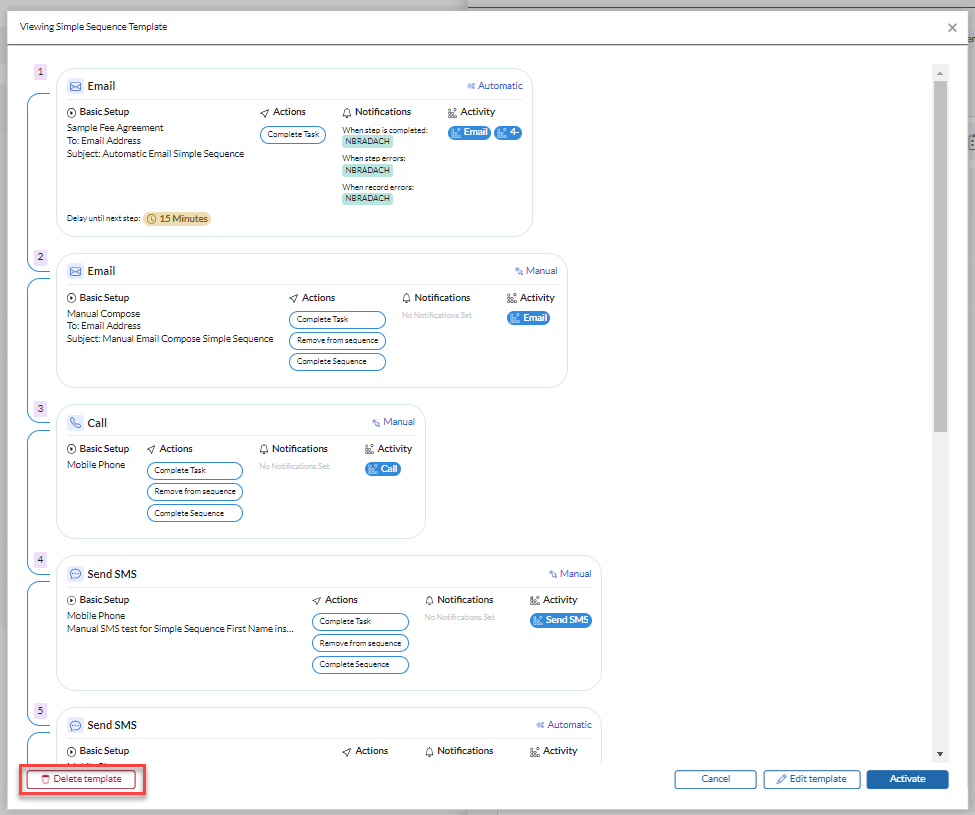
From this list the user can search for a template name, filter by Advanced and Simple Sequences, or apply sorting options. Clicking on the actions icon allows the user to view or edit a Simple Sequence template. For advanced Sequence templates the action icon will jump the user to the Advanced Sequence Overview Panel. Please note that editing a template will not affect any active sequences using a previous version of this template.

Simple Sequence Templates can only be deleted from the view Sequence screen. To do this click the actions icon from the Sequence Templates list view and select Delete Template from the bottom left-hand corner.
Simple Sequence Activation: #
- A Sequence can be activated by clicking the create a Simple Sequence icon
and following the above steps or by clicking the Sequence from template icon
and selecting the desired template. (The activate button will appear grayed out until all steps have been saved).
- After clicking activate you will need to make sure the Simple Sequence name, begin date, and timezone are filled out.
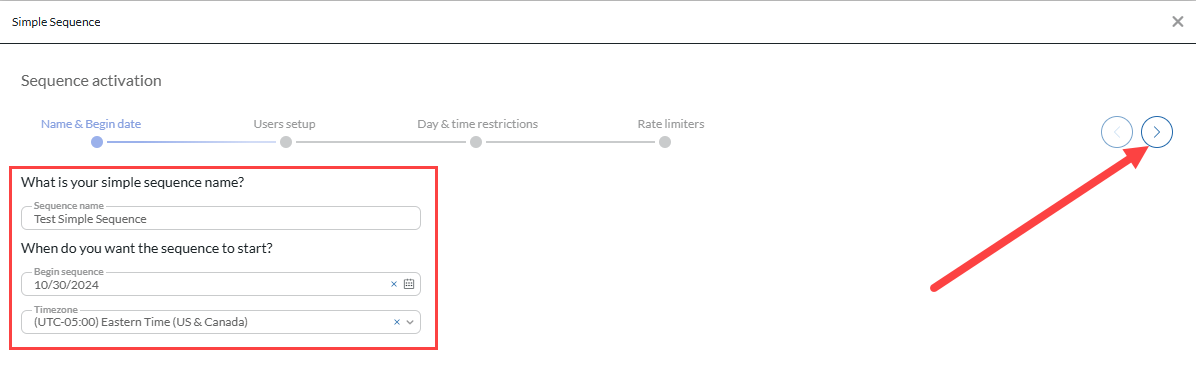
- Navigate to the between activation steps by clicking the navigation arrows
in the upper right corner of the window.
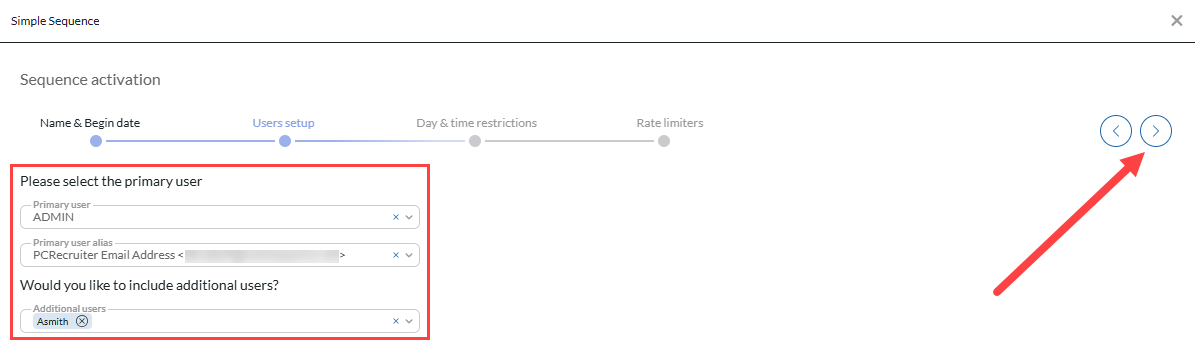
- Select the primary user, additional users, and email alias (If an automatic email step is involved)
- The primary user’s email aliases will be available in the dropdown but additional users will also be able to view and interact with the Sequence steps.
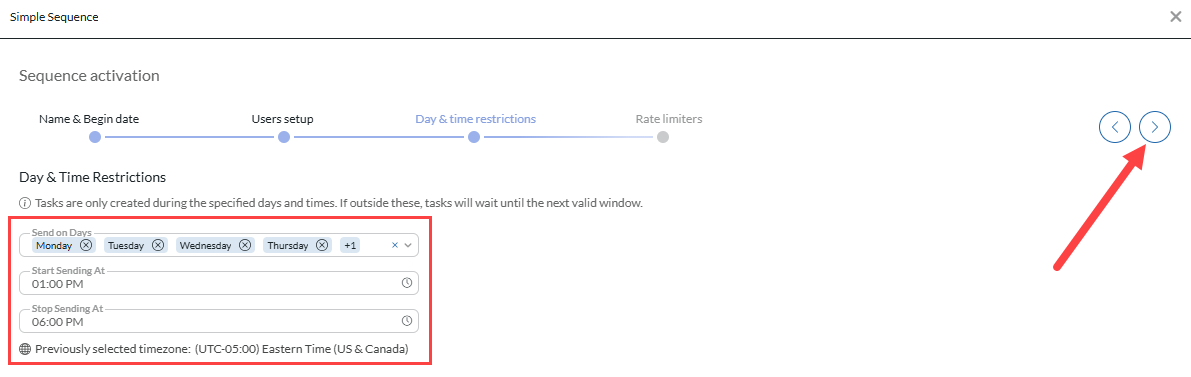
- Select the days and times you want tasks to occur (optional).
- Please note that this will affect all tasks in your Sequence. For example if I select Monday and Wednesday as my send on days, tasks will only appear on these days even if a delay would trigger the task to start on a different day.
- Select your desired rate limiters for automatic email or SMS tasks (optional). (Please note that the rate limiting options will only appear if an automatic Email or SMS step exists in the Sequence.)
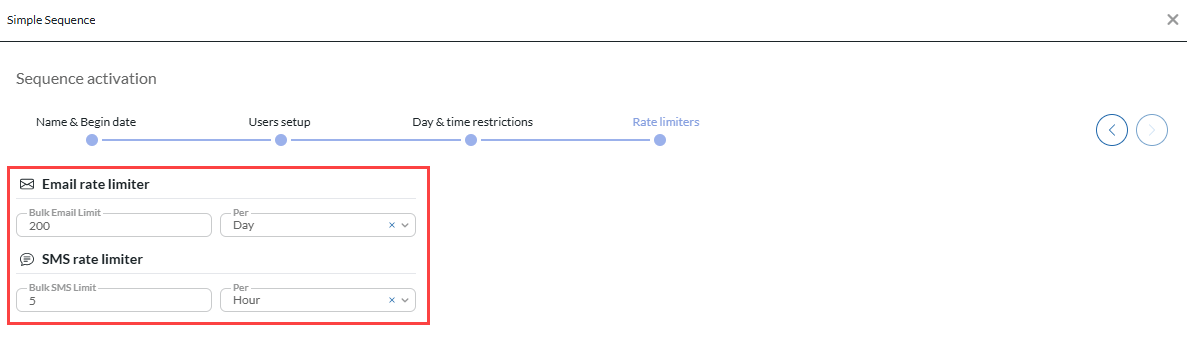
- Click activate to begin the Sequence.
- You will now see the Sequence name, running icon
, Simple Sequence icon
, Sequence options button, and Sequence column in the Name Tab of a Rollup.
- From the Rollup List Grid you will now see the name of the sequence and the Simple
or Advanced
Sequence icon under Rollup Lists that have an active Sequence attached to them.
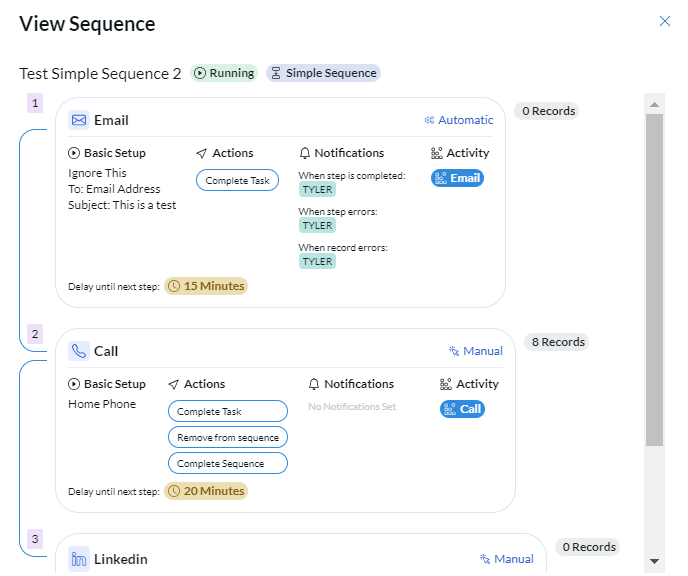
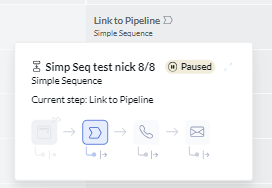
- Clicking on the Sequence name will open the view Sequence window. This window will show you all the steps of the Sequence, their details, and the number of records currently in that step.
- You will now see the Sequence name, running icon
Simple Sequence Use: #
Working a Sequence #
Simple Sequence tasks can be completed from both the Sequence Task screen and the Rollup Grid using the List or Kanban views. Please note: The Sequence Task screen contains both Advanced and Simple Sequence tasks. Simple Sequence tasks will be indiciated with a Simple Sequence Chip.
Rollup List View #
- Navigate to a Rollup with an active Simple Sequence linked to it.
- In the Sequence column you will see the step that the name record is currently in. If they are in the queue, then it will display a pending status.
A name record that has completed the Sequence will display Sequence Complete here.
- Click on the Sequence status to open a popup window that shows the branch map, previously completed steps and the current location of the Name record in the Sequence.
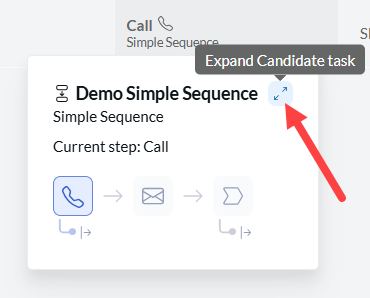
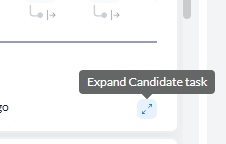
- Click the expand candidate task icon in the upper right corner of the popup window to open the candidate task window.
- The Sequence can now be interacted with on the right hand side of the window by clicking the action buttons and/or filling out the required fields.
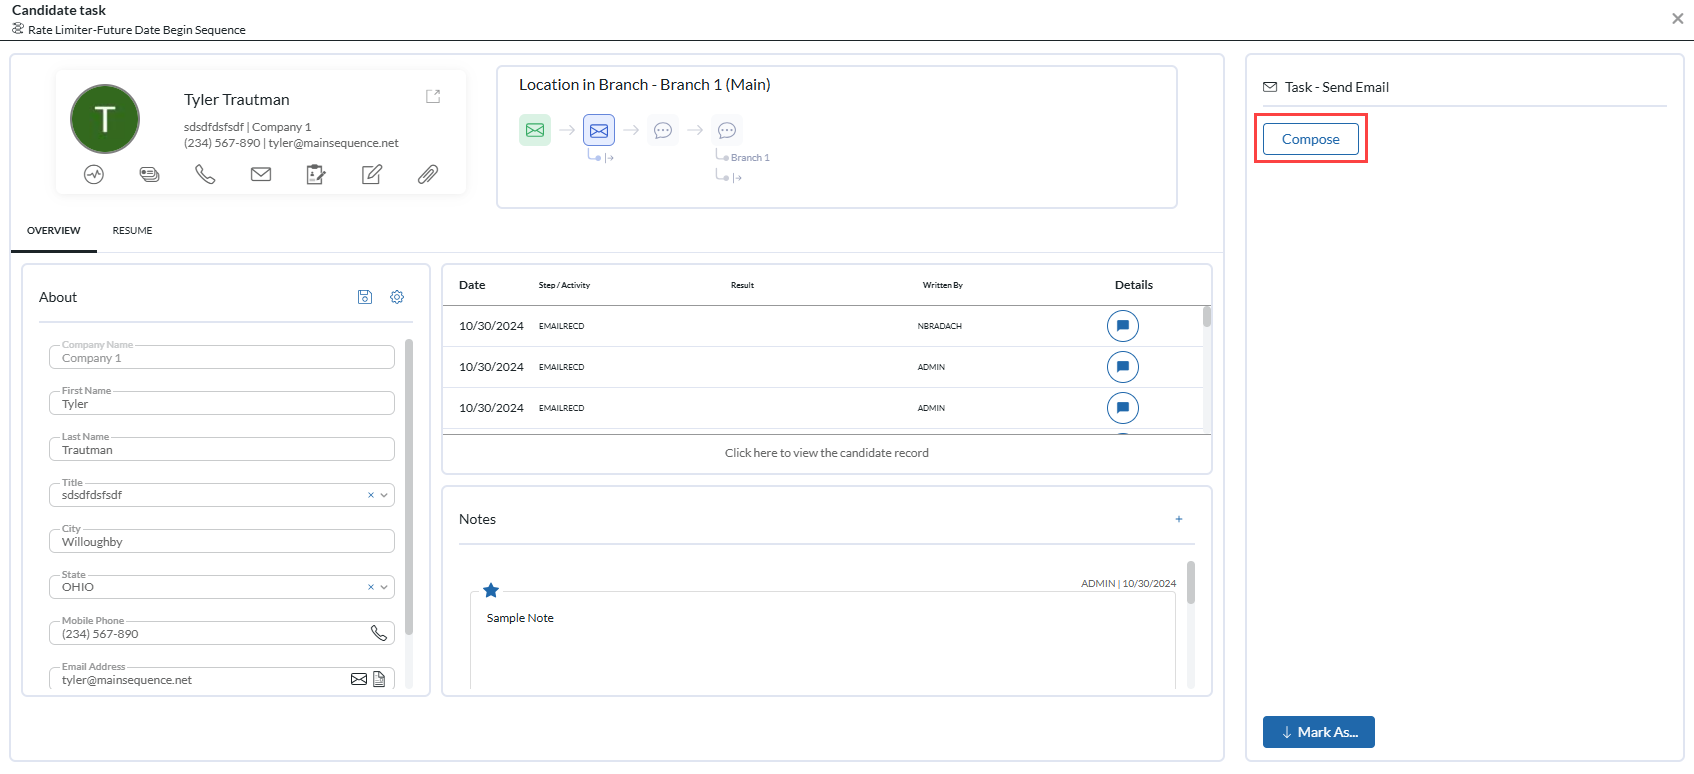
- Once the task is completed, click the mark as button below and select the appropriate condition (Task complete moves them to the next step and “Remove from Sequence” takes them out of the Simple Sequence and off of the Rollup list).

- The Simple Sequence task is now complete and the name record will move to the next step of the Sequence unless there is a designated delay.
- You can also complete a Sequence task, move a pending record to the next step early, Skip to a future step, Jump Back to a previous step, or remove a name record from a Sequence by clicking the actions icon from the Rollup list.
- Click the actions icon.
- Hover over more actions from the dropdown menu.
- Hover over Sequence actions.
- Select Complete Task, Move to next task now, Skip Ahead, Jump Back or Remove from Sequence.
- Click the actions icon.
Skipping Ahead in a Simple Sequence #
- Skipping ahead in a Simple Sequence allows you to skip over steps in the process to a later step without having to complete each step in between (example moving from step 1 to step 4).
- This can be from within the Sequence task screen by clicking the skip ahead icon
in the top right corner.
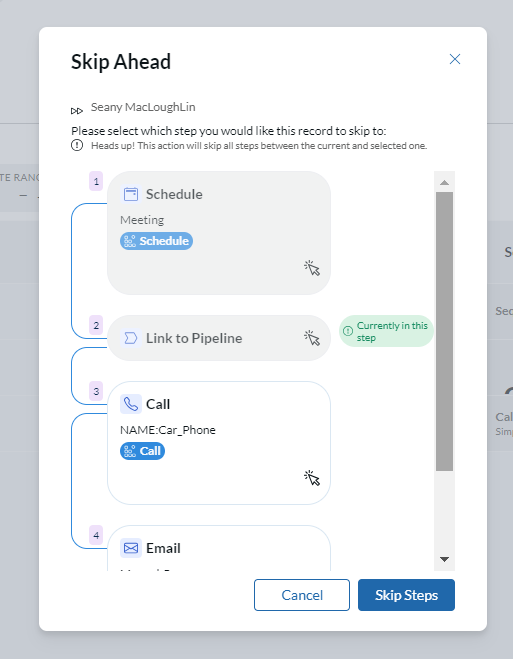
- From the skip ahead screen you will select which step you would like to move the name record to in the Simple Sequence (Completed steps will be grayed out, you cannot go backwards in the Simple Sequence).
- Click skip steps to move the name record to that step, ignoring all steps in between the current and selected step.
- This can also be done from the Rollup grid view with the following instructions.
- Click the actions icon.
- Hover over more actions from the dropdown menu.
- Hover over Sequence actions.
- Select skip ahead.
- Follow the above instructions in the skip ahead window.
- Please note that this can also be done while a record sits in the queue.
- Click the actions icon.
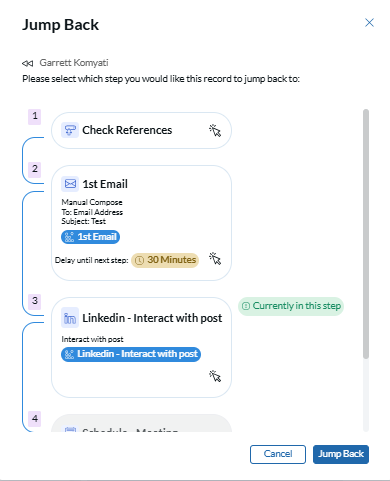
Jumping Back in a Simple Sequence #
- Jumping back in a Simple Sequence allows you to redo a step in the process that has already been completed (example moving from step 4 back to step 2).
- This can be from within the Sequence task screen by clicking the jump back icon
in the top right corner.
- From the jump back screen you will select which step you would like to move the name record to in the Simple Sequence (Future steps will be grayed out, use the skip ahead function to move to a future step).
- Click jump back to move the name record to that step. Record will now move through the Simple Sequence as if they had not completed the previous steps.
- This can also be done from the Rollup grid view with the following instructions.
- Click the actions icon.
- Hover over more actions from the dropdown menu.
- Hover over Sequence actions.
- Select jump back.
- Follow the above instructions in the jump back window.
- Please note that this can also be done while a record sits in the queue.
- Click the actions icon.
Kanban View #
Simple Sequencing tasks can be viewed in both the grid view and Kanban view. This view allows users to utilize a card view to interact with the Sequence steps by dragging and dropping the cards to Skip Ahead or Jump Back in a Simple Sequence. Dragging and dropping does not complete tasks, use the task view or action icons to complete the step. You can access the Kanban view by clicking the Kanban icon in the top right corner of the Grid.
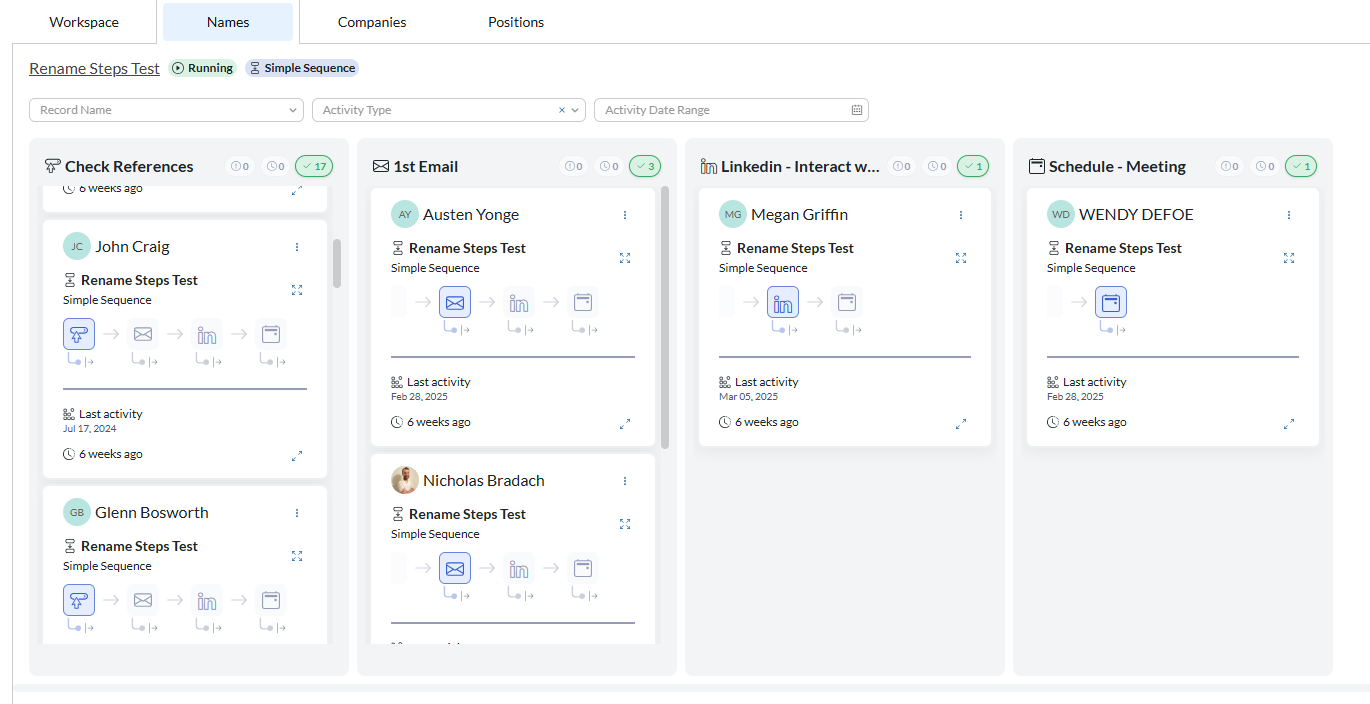
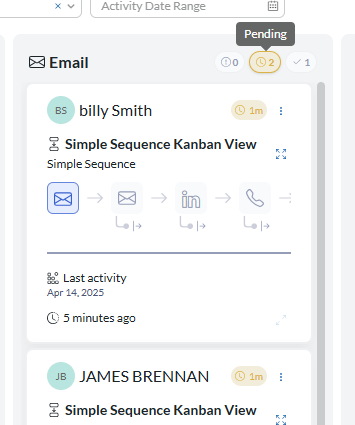
Each step is divided into columns which are filtered by tasks that are Active, Pending, and Errors. Click the Task status icon you wish to view to see all records with that status in the step.
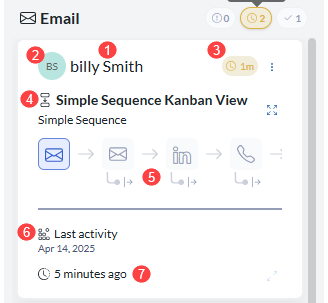
- The card view shows the following information:
- The Name of the Record
- The record logo which can be clicked to open the record flyout.
- An icon indiciating the length of the delay or error for that record.
- The name of the Sequence
- A preview of the Sequence Map (Which can be expanded with the Expand map action icon)
- The last actitidy date for that record.
- How long the record has been in that step.
- In the bottom right, there is an Expand Candidate Task button. This will open the task pane for you to complete the Current Task right from the Rollup list. (If the Sequence is paused you cannot interact with the step)
- In the top right you will see the actions icon which allows users to interact with the current Sequence Task that the name record is in. This allows you to skip steps, jump back, complete a task, or remove the record from the Sequence. complete a Sequence task, move a pending record to the next step early, Skip to a future step, Jump Back to a previous step, or remove a name record from a Sequence by clicking the actions icon from the Rollup list.
Pausing/Ending a Simple Sequence #
- To pause a Sequence click on the Sequence Options button in the top right-hand corner of the Rollup name record tab followed by the pause icon
(The Sequence will now show the paused icon
next to the Sequence name in the top left corner of the screen).
- A paused Sequence task can be viewed but not interacted with. Additionally delays and automatic tasks will not be triggered until the Sequence is running again.
- Once the Sequence is paused, clicking the end Sequence icon
will end the Sequence and disconnect it from the Rollup.
- Only one Sequence can be connected to a Rollup at a time but once the Sequence has been ended then a new Sequence can be activated from that Rollup list.
Editing an active Simple Sequence: #
- Click on the Sequence Options button in the top right-hand corner of a Rollup list with an active Simple Sequence connected to it.
- A Sequence must be paused by clicking the pause icon
- Once the Sequence is paused it can now be edited by clicking the edit icon
- The Simple Sequence edit window will then open. This window will show the current Sequence steps that you have set up.
- Steps can be disabled or added to adjust the flow as desired.
- Note that name records in a step that is disabled will remain in that step until the task is completed, however, any new name records will skip over that step.
- After making all desired changes click the save Sequence button to return to the Rollup view.
- Click the resume icon
in order to reactivate the Sequence.
Simple Sequence Step Types: #
- Email (Manual):
Email step that allows user to manually send out an email. This can be based on a Form Letter or a blank email to be manually created.
- Required fields: To field (Email address from name record), Subject field, Form Letter (Manual compose or specific Form Letter)
- Email (Automatic):
Email step that allows user to automatically send out an email. This must be based on an existing Form Letter.
- Required fields: To field (Email address from name record), Subject field, Form Letter
- Call step (Manual):
Call step that prompts the user to call the name record.
- Required Fields: Phone field from the name record.
- SMS (Manual):
Prompts user to send an SMS which can be based off of a pre-set text that can be edited or a blank text that can be manually composed (Insert fields may be used to autofill information from the database).
- Required fields: Phone field that SMS will be sent to.
- SMS (Automatic):
- Required fields: Phone field that SMS will be sent to, SMS text content.
- LinkedIn:
Prompts the user to jump to the name records linkedIn Profile via URL(If in the database) and perform a specific action on their Profile.
- Required fields: Selection of which action the user should take: View Profile, Interact with post, Connection request, send InMail.
- Link to Pipeline (Manual):
Allows user to search for and select a position Pipeline for the name record to be added to. There are no required fields for this step. Name records can be linked to multiple position Pipelines from this step.
- Link to Pipeline (automatic):
- Required fields: Position Pipeline.
- Schedule (Manual):
Prompts user to add a calendar appointment to their schedule, this can be either a meeting (Calendar event) or an interview (Pipeline step + calendar interview). This will move the candidate to the selected step in the chosen position Pipeline, however, this can not be used to add a name record to the inbox or add a placement for the candidate.
- Add to Rollup:
Can be used to add a Name record to an additional Rollup List. This is an automatic step so selecting the Rollup is the only option.
- Required fields: Select Rollup List.
- Other Action (Manual):
Provides the ability to create a custom Step outside of PCRecruiter’s pre-built options. This area also includes Instructions and Script fields to give further detail to the task.
Rate Limiting #
Email Rate Limiting #
- Email Provider Mass Emailing Reference articles: It is important to note that we cannot guarantee any specific numbers that will allow for a ‘safe’ amount of emails to send within a specific timeframe. Each provider uses number of different criteria so it is always best to contact them regarding safe sending limits.
- Microsoft 365 Online Limits
- Gmail Sending Limits
- It is always best to be conservative when sending out large amounts of emails. We do not recommend using the full listed amount right away, the rate limiter can always be adjusted in the future.
- If you are worried about your email integrity or require large amounts of emails to be sent out you may want to consider a bulk email provider as an option.
- The email rate limiter is set based on a per alias basis. This means that all bulk emails sent out from the system will be considered when utilizing the rate limiter. For example: A rate limiter of 200 emails per day is set for a Sequence which runs from 8am-9am while a second Sequence, under the same username and email alias, is set for 200 emails per day which runs from 3pm-4pm. When the first Sequence begins at 8am the rate limiter will send out 200 emails and then stop sending since it has met the daily limit. When the 3pm Sequence would kick off it will not send any additional emails due to the previous 200 already counting for the day. There are a few other items that should be considered when setting up these rate limiters.
- Rate limiters only apply to bulk emails sent out via Email Campaigns or Sequences, meaning that individual emails do not count in the overall number, however, those emails may still be counted by your email provider as part of your daily sending limit. Make sure to contact them for more specific details.
- It is always recommended to include a way for the recipient to opt-out of further communications.
SMS Rate Limiting #
- Currently the RingCentral integration is the only option for sending SMS messages through our Sequencing feature. Click HERE for their guidelines on Bulk SMS messages.
- SMS rate limiter works on a per number basis, meaning that each user will have their bulk SMS messages counted against all Sequences across the database, but not individual or manual SMS messages.
- It is always recommended to include a way for the recipient to opt-out of further communications.