Deleting Users #
Deleting a user will deny access to the database with those credentials and remove the user name in User Name dropdowns going forward.
Any records, activities, interviews, Rollups, etc. created by that user account will remain in the system.
NOTE: If you wish to disable access to an account during a leave of absence but intend to reactivate it on a future date, do not delete it. Instead, use the “Account is Disabled” checkbox found at the bottom of the User Record in the Security area.
To remove a username:
- Click Settings in the Main menu.
- Click Users.
- Click Manage Users.
- Click on the user name you wish to remove.
- Click the Delete icon, which is found in the Action menu at the top of the record.
- Confirm the deletion.

Change Username #
At times, you may wish to change the Username throughout the database. For example, if user JSMITH has changed last names and should be JMASON, you might wish to rename their account and all records associated with their account to a new name.
First, the user will need to delete any PCRMail Mail Servers set up under their username:
- Open PCRMail (envelope icon) at the top right of PCR
- Select “Configure” (gear icon) at the top left
- Select “Mail Servers”
- In the bottom frame, use the Action dropdown to the left of your Mail Servers to select “Delete”. Larger Mail Servers may take a while to delete.
Feel free to contact support@mainsequence.net if you need help deleting a Mail Server or if the request to delete a larger Mail Server times out.
Next, change the username. (Only a user with full admin permissions will be able to complete this part of the process):
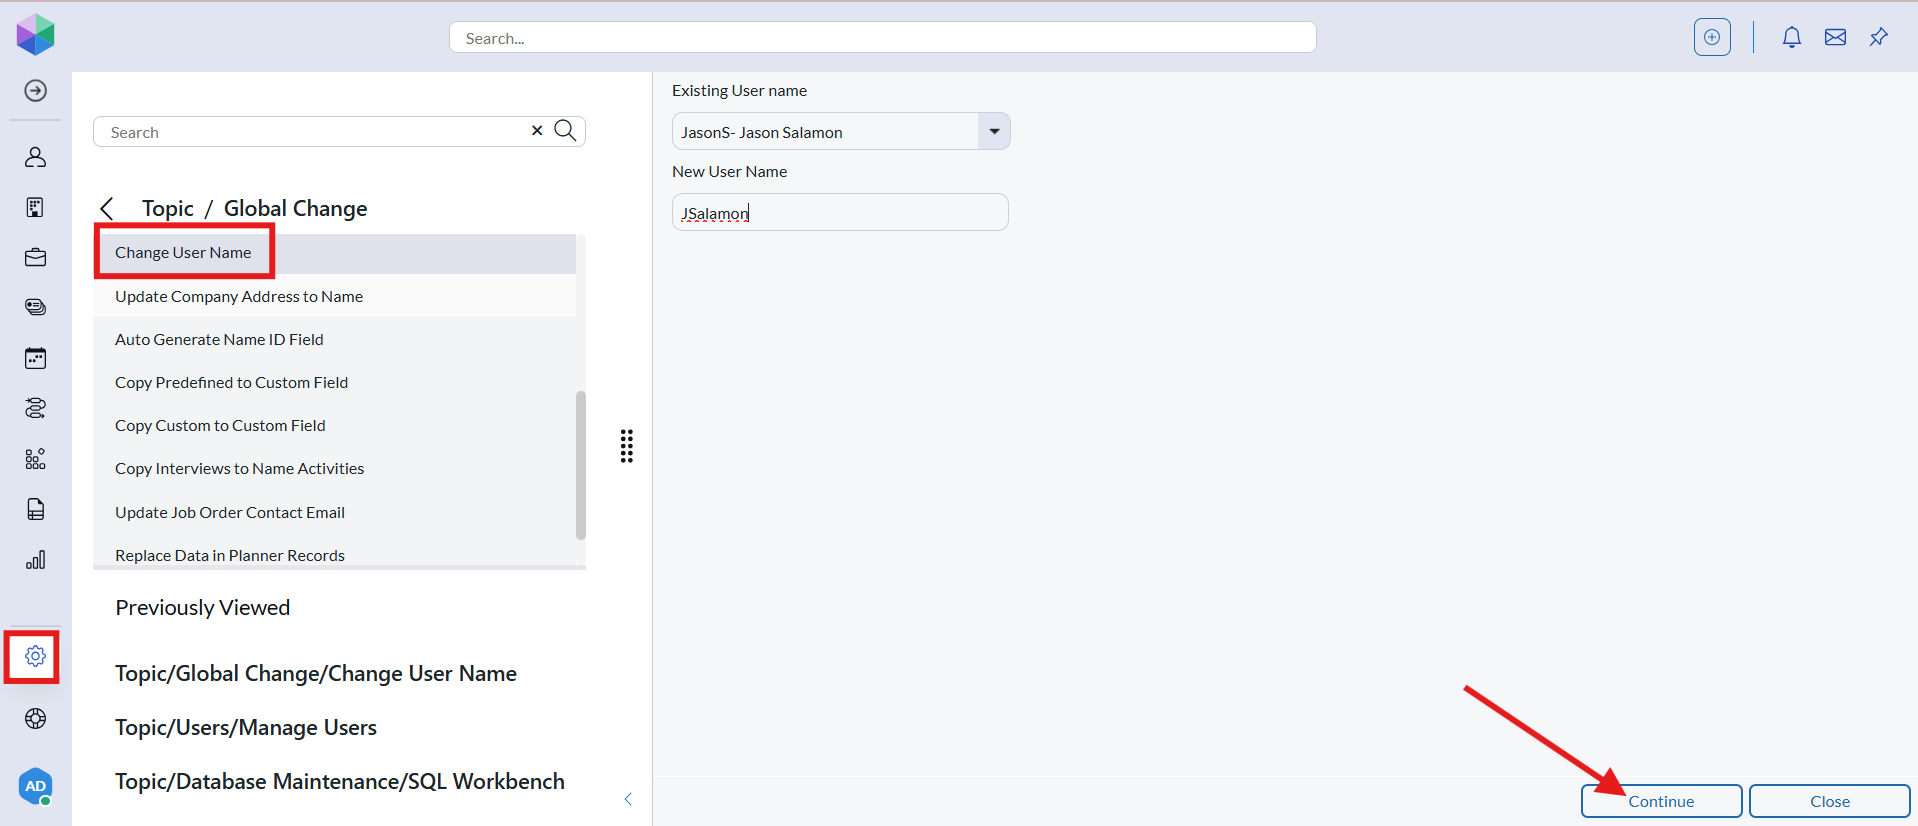
- Click the Settings on the Main menu.
- Click Global Change.
- Click Change User Name.
- Select the Existing User Name from the dropdown.
- Enter the New User Name. NOTE: Enter only the new 1-10 character username. Do not enter the full name here.
- Click Save.

Finally, the user can now re-add the Mail Server to their changed Username. Click Here to view instructions for Adding a Mail Server.
Copy User Settings #
- Click the Settings on the Main Menu
- Click Users, then Manage Users
- Navigate to the Action Dropdown Menu
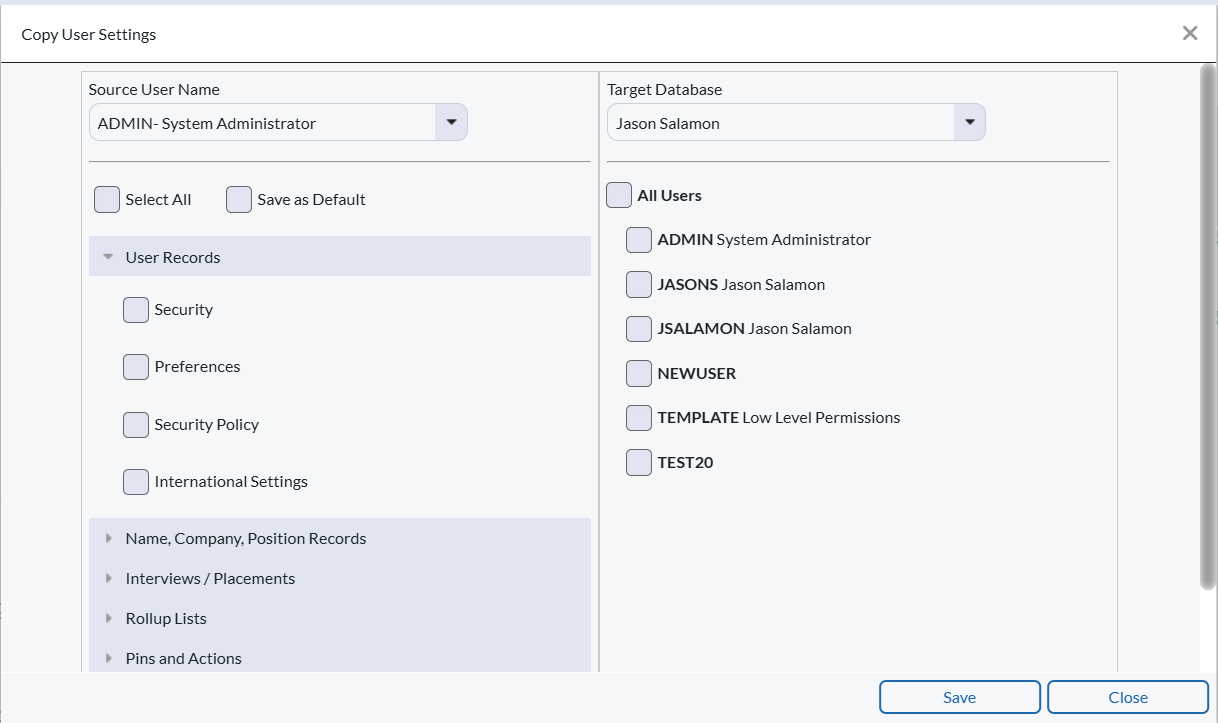
- Select Copy User
- In the pop-out window, select the User you want to copy from the Source User Name dropdown.
- Select the settings you wish to copy from the menus below
- User Records
- Security: Use this to Copy Security settings between multiple users.
- Preferences: Use this option to copy another user’s preference settings to this user. (Auto write activities, merge records, auto display options, etc.)
- Security Policy: Use this option to copy only the Security Policy section of another user’s setup. (Password expires, account is disabled, user must change password, etc. – this is typically not used as these are mostly very specific settings.)
- International Settings: This option copies a user’s international settings to a new user. (Country Name, Country Code, Default Area Code, etc.)
- Name, Company, Position Records
- Record/Search Layout – Name, Company, Position: Use this to copy Name, Company, and Position layouts to other users. (Legacy feature, layouts are now copied directly from the Dashboard/Workspace/Record Grid).
- To Copy the Search Grid view, check the section ‘Copying Grid Views Between Users’ located here: Record Grids
- To copy Record Workspaces, check the section for ‘Copy Record Workspace Between Users’ located here: Record Workspace
- Record Card – Name, Company, Position: Record Cards are used to display your recently viewed records. This option will copy the fields and quick action icons that are displayed. (Contact Support to adjust this setting, only applies to Pipeline Record Cards)
- Activity Defaults: Name, Company, Position: Use this to change the Default Activity settings between users.
- Record/Search Layout – Name, Company, Position: Use this to copy Name, Company, and Position layouts to other users. (Legacy feature, layouts are now copied directly from the Dashboard/Workspace/Record Grid).
- Interview / Placements
- Interview Settings: Copies the options selected when accessing the Add Interview screen. (Legacy Feature)
- Pipeline Configuration: Copies the Pipeline column headers, rows displayed, and additional details – This does not include Interview Types and Status as those are automatically applied to all users in the database. (Legacy Feature)
- Placement Layouts: Use this to copy the layout of the Placement Records between users
- Rollup Lists (Coming Soon!)
- Form Letters
- Copy Form Letters: Use this section to copy Form Letters. (Note: this will not be selected when using the ‘Select All’ option as this should only be used when copying settings between databases. Contact Support for more details).
- User Records
- Select the Target Database from the dropdown menu
- Select the Users you want to copy these settings to
- Click Save to apply these changes

